Adobe Acrobat Accessibility Checker
The Adobe Accessibility Checker is a powerful tool for evaluating PDF documents. PDF accessibility involves many elements, sometimes becoming very complex. For this reason, when appropriate, it is much simpler to create an accessible Word document first, then convert it to a PDF.
This page will teach you to run the Accessibility Checker, interpret the results, and fix issues. For any additional support regarding the Adobe Accessibility Checker or PDF accessibility, email elearning.oa@ttu.edu.
To use the Make Accessible action to create and verify accessibility it is important that you are using Adobe Acrobat Pro DC, not just a PDF reader. Adobe Acrobat Pro DC is available free for TTU faculty and staff through the eRaider website.
Using the Accessibility Checker
How to Run the Accessibility Checker
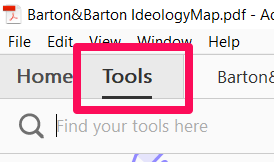
- Open your document in Adobe Acrobat Pro DC. Click the Tools tab.

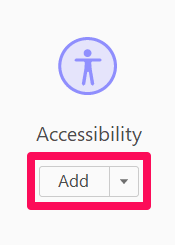
- Find the Accessibility tool icon. Click Add.

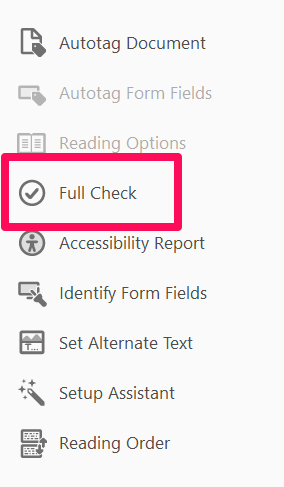
- When you Open the Accessibility tool, select the Full Check option from the right-hand pane.

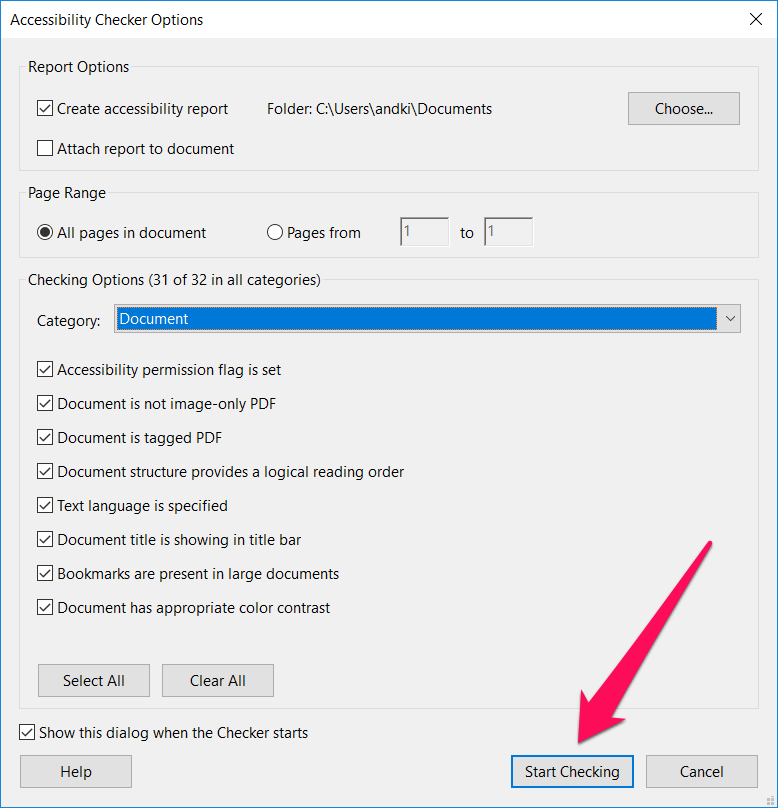
- When the Accessibility Checker Options box appears, select Start Checking to begin.

- The check may take a few moments. When it is complete the results will appear on the
left-hand side of the screen. Continue to the following section to understand the
results.
Interpreting the Accessibility Checker Results
The Accessibility Checker checks your document against a list of accessibility rules. The results include the full list of rules with one of the following states:
Passed: The item passed this accessible check.
Needs Manual Check: The item requires manual verification and is not included in the automatic check.
Failed: The item did not pass the accessibility check.
Skipped By User: The rule was not selected in the Accessibility Checker Options dialog box.
The items that require attention (Needs Manual Check or Failed) are bolded in the results to help draw your attention.
Fixing Accessibility Issues
To fix a failed item, right-click on the item and try one of the following options from the menu:
Fix: If this option is available, it is the easiest option. Acrobat either fixes the item automatically or displays a dialog box prompting you to fix the item manually.
Explain: Opens the online Help where you can get more details about the accessibility issue including some basic instructions for fixing the issue.
Check Again: Runs the checker again on all items. Choose this option after modifying one or more items to see if the issue has been resolved.
If you need assistance fixing an issue, we would love to help at elearning.oa@ttu.edu.
If you need any help using the Adobe Acrobat Pro DC Accessibility Checker, please contact us at elearning.oa@ttu.edu.
Online Accessibility at Texas Tech
-
Address
TTU Online | Texas Tech Plaza | 1901 University Avenue, Suite 513 | Lubbock, Texas 79410-5095 || Mailing: Box 45095 | Lubbock, TX 79409-5095 -
Phone
(806) 742-5944 -
Email
online.accessibility@ttu.edu
