Using Headings
Headings create structure in a document that is not only useful for sighted users but for those using assistive technology as well. The proper addition of headings into a document is among the most essential accessibility elements.
Assigning proper headings is the only way to make these content breaks available to assistive technology. Simply changing the font size or spacing will not allow a visually impaired student to "skim" the document for relevant headings, the way a sighted user would.
How to Create Accessible Headings
Headings in Microsoft Word
- Open your Word document and navigate to the Home tab. You will use the Styles section on the Home tab to assign heading levels to headings in your document.

- All headings should be appropriately nested with Heading 1 as the title of the document, Heading 2 assigned to primary headings, Headings 3 assigned to secondary headings, and so on. Best practice suggests not going beyond Heading 3 except in longer, more technical documents.
- To assign a heading style, highlight your heading text then right-click on the correct
heading level. Select, "Update Heading 1 to Match Selection". This will maintain the look of your heading.
- After you have updated a heading level to look the way you want it to look, you can simply highlight the next heading and then click the desired heading level. (Note: Typically the Heading 3 option won't appear until a Heading 2 has been assigned.)
- After completing all of your headings, check that they have been properly assigned
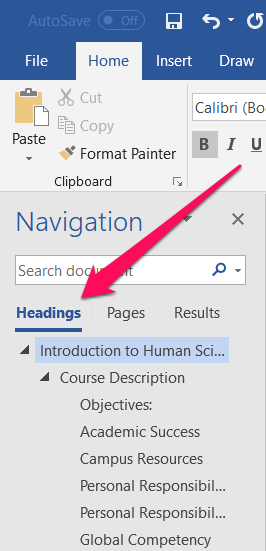
by using the Navigation Pane. Click CTRL + F and the Navigation Pane will pop up on the left-hand side of the screen. Click Headings and you will see an outline view of the headings that have been assigned. Check to
see that all headings are present and correctly nested.

Headings in Blackboard
- Open your Blackboard course and navigate to a content item that needs headings. Once
you see the item that you'd like to edit, hover near the title and you will see a
small chevron appear to the right of the title. Click on that chevron and then select Edit from the menu that pops up.
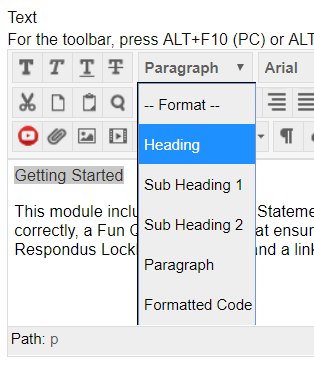
- Once the item is open, you will see the text content in a rich-text editor like the
one below. From here, simply select the text that you want to tag as a heading and
then click on the format drop-down menu and choose the appropriate heading level.
The selected text will automatically become bigger and carry a bold weight. If you
decide to change the look of the heading, be sure that the format drop-down menu still
has the appropriate heading level indicated after you make the changes.
Helpful Links
Video: Creating Accessible Headings in Word (1:25)
Video: Creating Accessible Headings in Blackboard (1:47)
Online Accessibility at Texas Tech
-
Address
TTU Online | Texas Tech Plaza | 1901 University Avenue, Suite 513 | Lubbock, Texas 79410-5095 || Mailing: Box 45095 | Lubbock, TX 79409-5095 -
Phone
(806) 742-5944 -
Email
online.accessibility@ttu.edu


