
Powering Up Procedure S5OOO
- Add liquid nitrogen to cold trap.
- Turn display power toggle on - pull gently and turn over - sets the instrument electronics to their zeros.1
- Open specimen chamber air lock - this isolates the gun chamber from the column
- Will need to flash the tip once a day2 When the green HV "ready" light is on, hit the "Flash standby" button. Then hit "On" button. The emission current will shoot up to -36 µA; this just takes a moment. Then turn on HV using the "On" button.
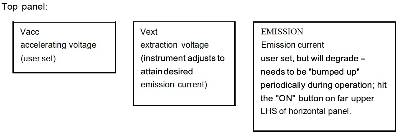
1Specimen chamber will make noise and move into its zero position.
2 Not more than once a day - doing so will start to round-off the tip. Flashing blasts any contaminants off the tip and on to the anode. During operation, the contaminants will gradually migrate back to the tip.
Column Alignments
- Gently introduce specimen holder according to directions on the specimen exchange chamber3
- Standardize height by setting the lens current to zero and moving the sample into the lens to achieve focus.4 Hit the STD button on the RHS vertical panel. Bring specimen image into focus with the small knob at the base of the specimen holder Hit STD to exit the height adjust mode.
- Select column adjustment - button "3" in the horizontal panel. The alignments are
in order; navigate between them using the up and down arrows. Select an alignment
mode with the return button. Once in a given alignment mode, the stigmators become
the alignment knobs. Hit "exit" to get out of a given alignment mode.
- Beam - carefully take out the aperture so as not to hit the x,y controls; center beam on screen with stigmator controls. Use mag control to make the beam spot large enough to judge how well it is centered.
- Apperture 5 - can be fussy, so be patient. The x,y controls are not truly x,y - they are on a diagonal. One is on the front of the aperture and the other is on the side, toward the door of the room. Hit the return key to pause the action.
- Stigmator coils - select stig alignment x or stig alignment y; minimize image shift with the corresponding stigmator knobs. These are true x, and y, so the x will correct horizontal shift and the y will correct vertical shift.
- Stigmation - check constantly by critical evaluation of your image as you focus. Before taking a picture, check stigmation at higher magnification.
- It is difficult to do column alignments without a specimen in, so always load a sample first.
- Failure to standardize height costs resolution.
- Apperture can come out of alignment as it heats up during operation and can be thrown out of alignment by badly misaligned stigmators. Watch out for image shifts as you go in and out of focus.
Picture Taking
- Open Quartz PCI on the PC desktop - hit the +1 button in the far left-hand side of the task bar
- Focus image, check stigmation at higher mag, and abc (auto-contrast and brightness); Hit the "direct" picture button on the upper RHS of the horizontal panel. Cancel or restart a picture collection by hitting the "direct" button again.
- Process the image by going to Process è histogram èauto to adjust levels. Click the "T" icon to enter text. Go to Overlay è apply to image to save the text addition. File èexport and save to desired location
- After taking the picture, hit the "A" button on the upper LHS of the horizontal panel to return control of the screen to the instrument.
Specimen Exchange
- Hit the green "off' button on upper LHS of horizontal power to shut off Vacc
- Close specimen chamber air lock toggle to isolate gun.
- Remove specimen according to instruction on specimen chamber
- Pull out, roll back, pull out, roll forward. Once the light on the evac/air toggle is blinking, flip the switch. WAIT Once you hear it vent and the light has gone out, you can remove it.
- Insert specimen holder until you hear the microwitch trip. Flip the toggle to "evac" and WAIT. When the light blinks, roll the specimen holder back and let the vacuum pull it in, roll forward, and insert the rest of the way making sure not the let the jewel tip slam into position - it could break.
General Considerations S5OOO
- 1K is about the lower limit of this instrument - not really designed for very low mag work. This instrument is designed for thin film specimens, so the depth of field is very thin.
- Column adjustments are fairly stable, the beam is pretty stable, especially if you don't change voltage. Stigmation is a constant adjustment; if the stigmators are severely out, they will affect the aperture alignment. Look for the image shifting as you go in and out of focus as a tip-off that this has happened.
- The instrument is sensitive to mechanical and acoustic vibrations. Keep the door closed, don't talk during high mag imaging, avoid resting your arm on the table which supports the column.
- Fine focus has a limit of 10 turns. If you're at one limit, turn the focus knob 5 turns to center it, then bring the image into focus with the coarse focus.
- When operating below 5kV, you need to put in the low voltage shield to stabilize the beam.
- Can change photo speed if the specimen is not stable to slow scan rates. Hit the “Photo condition” buttonè select option 1 photo speed è can change down to 40s which is the fastest image collection
College of Arts and Sciences Microscopy
-
Email
bo.zhao@ttu.edu