
RaiderCanvas Support
Canvas Studio Interactive Videos
Canvas Studio can be used to create video quizzes in Canvas. Through Canvas Studio Quizzes, you can create a video with questions to evaluate how well students are comprehending the video content. This also gives students an interactive video learning experience that provides feedback to help them monitor their own understanding of the video content.
Create a Canvas Studio Video
Canvas Studio videos can be created either by uploading existing media or by creating new media using Studio to record your screen and/or webcam.
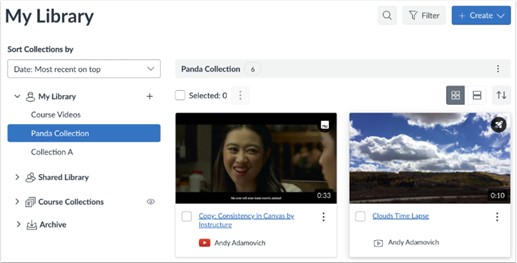
Upload a video to Canvas Studio
In Canvas Studio, you can upload supported media files from your device by dragging and dropping a file into the My Library page or by using the Add Media link. Studio supports uploading an individual media file or multiple individual files at once.
Once the media file is uploaded in Studio, you can add annotations, share access, and manage the media using the media tabs.
Studio also supports adding videos from YouTube and Vimeo via URL.

Drag and Drop Media File
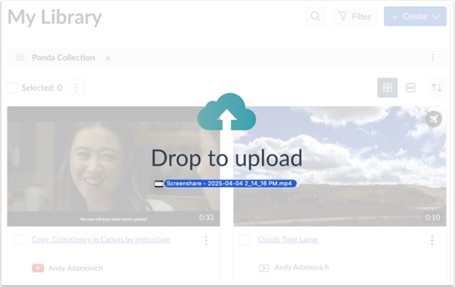
To add a media file to any page in Studio, you can drag and drop files from your computer.
Add Media
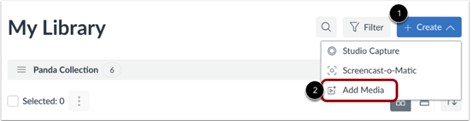
To browse your computer for a media file, click the Create drop-down menu [1]. Then click the Add Media link [2].
Notes:
- You can upload multiple media files at once. However, Studio cannot upload compressed (ZIP) files.
Browse Files
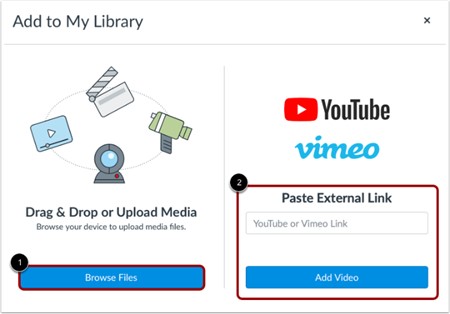
In the Add to My Library window, click the Browse Files button [1]. You may also be able to add media via YouTube or Vimeo URL [2].
Upload File
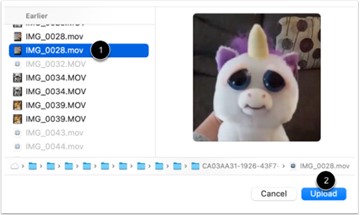
Select the media file you want to upload [1]. Then click the Upload button [2].
View Uploaded Media
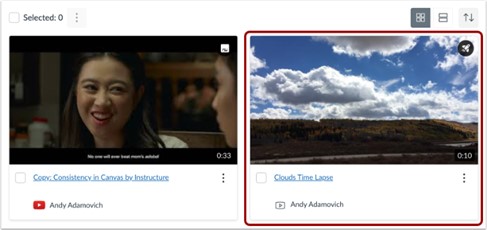
To view the media, click the media thumbnail.
Manage Media

To view the media in a library or course, click the Media Location drop-down menu [3]. If the media is added in a course, you can view course-specific media details.
Note: To download a transcript of the media, the captioning option must be enabled by the owner of the media.
Record a Canvas Studio Screen Capture Video
Open Studio Capture
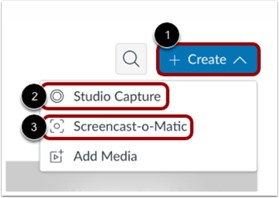
Click the Create drop-down menu [1]. Then, click the Studio Capture link [2].
Open Canvas Studio Capture

Click the Screen Capture drop-down menu [1]. By default, Screen Capture is disabled. To enable Screen Capture, click the Enabled link [2].
Share Browser Tab
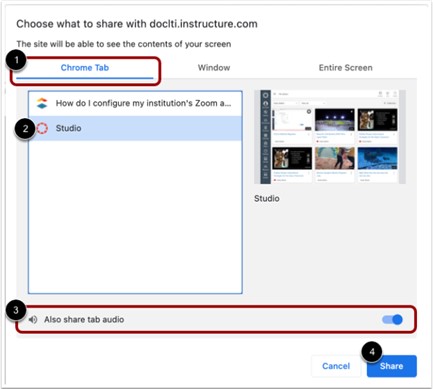
To screen share the contents of a tab on your browser, click the [Chrome] Tab option [1]. Then, select a tab name from the list [2].
To share tab audio, click the Also share tab audio toggle on [3].
To begin screen sharing, click the Share button [4].
Note: The Share button starts screen sharing only; it does not begin recording.
Share Window
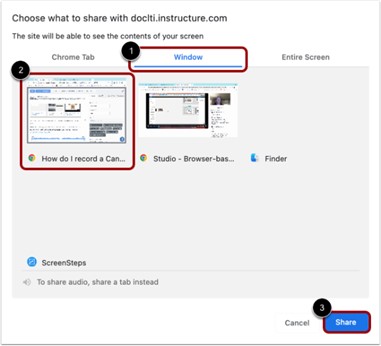
To share an entire browser window on your computer, click the Window tab [1]. Then, click the Window Preview tile [2].
To begin screen sharing, click the Share button [3].
Note: The Share button starts screen sharing only; it does not begin recording.
Share Entire Screen
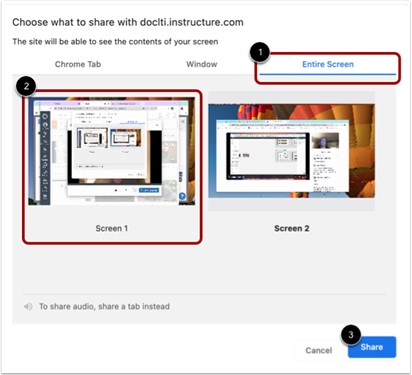
To share your entire computer screen, click the Entire Screen tab [1]. If you have more than one active screen, click the preview tile for the screen you want to share [2].
To begin screen sharing, click the Share button [3].
Notes:
- The Share button starts screen sharing only; it does not begin recording.
- If you receive an error message when trying to initiate entire screen sharing, check to make sure that your browser has been enabled for screen recording in your computer settings.
Enable Picture-in-Picture

If you select the Entire Screen tab, you can enable your webcam during recording to create a picture-in picture display.
After you click the Share button, the Enable Camera window displays. To enable your camera and open the picture-in-picture display, click the Yes button [1].
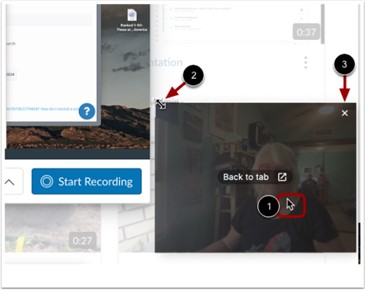
The picture-in-picture window displays a live view from your webcam. To move the picture-in-picture window, click your cursor on the window, then drag the window to a new location [1].
To resize the window, click the cursor on a corner of the window to display the Resize icon [2]. Then, drag the corner to resize the image.
To close the picture-in-picture window, click the Close icon [3].
Begin Recording

Click the Start Recording button.
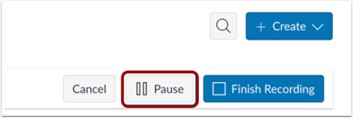
To pause recording, click the Pause button. This pauses both your screen recording and your webcam recording.
Resume or End Paused Recording
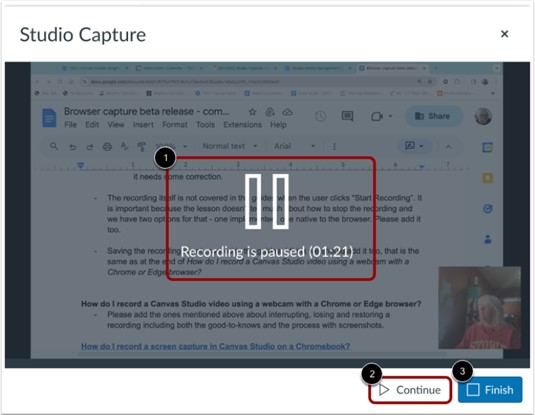
The recording paused message and timestamp displays [1].
To resume recording, click the Continue button [2].
To end the paused recording, click the Finish button [3].
Stop Sharing

To stop screen sharing, click the Stop sharing button.
Note: When a recording is in progress, clicking the Stop sharing button ends the recording.
End Recording
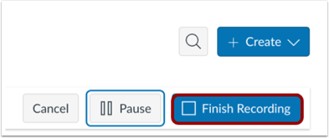
Alternatively, to end a recording that is in progress, click the Finish Recording button.
Preview and Save
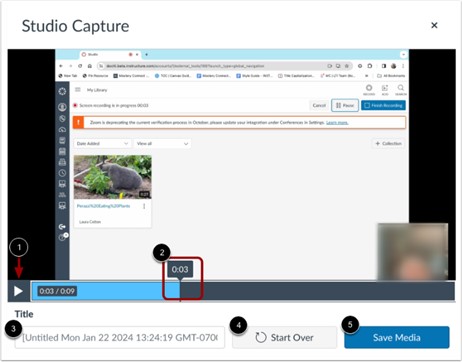
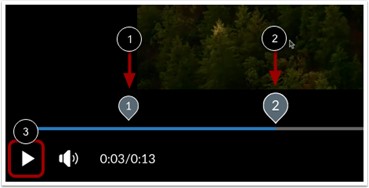
To preview the recording, click the Play button [1]. To navigate forward and back in the recording, hover your cursor over the timestamp bar and slide the cursor to the part of the recording you wish to view [2].
To rename the recording file, enter text in the Title field [3].
To delete the video and begin a new recording, click the Start Over button [4].
To save the recording, click the Save Media button [5].
Add a Canvas Studio Video to Canvas course
For users to view a Canvas studio video (or take the quiz), you must embed the media in a Canvas course.
Open Studio in Rich Content Editor
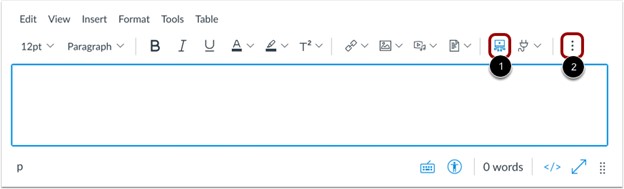
Open any Canvas feature area that supports the Rich Content Editor, such as Discussions, Assignments, or Pages. Click the Studio icon [1].
If the Studio icon does not display in the toolbar, click the Options icon [2].
Select Media
In the Studio Embed window, locate the video quiz and then click the media thumbnail.
Embed Quiz

Click the Embed Quiz drop-down menu and select the quiz you want to embed [1]. Then click the Embed Media button [2].
Note: Once you select a quiz from the Embed Quiz drop-down menu, the Display Media Tabs toggle and Start embedded media at fields do not display.
View Embedded Media

View the embedded media in the Rich Content Editor [1].
You can also view and edit media details [2], view insights [3], manage captions [4], or view quiz results [5].
You can remove the media from the page by highlighting it and pressing the Delete key on your keyboard.
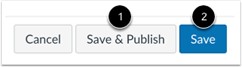
Publish Media
To publish your Rich Content Editor content immediately, click the Save & Publish button [1]. To save your content as a draft, click the Save button [2].
Creating a quiz in Canvas Studio
Locating Media to Create Quiz
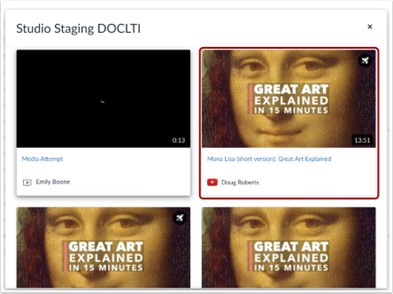
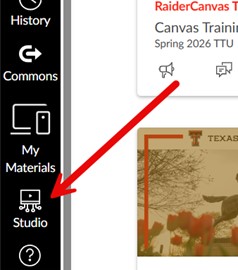
Studio Quizzes must be created from your My Library area in Canvas Studio. To navigate here, select the Studio link on the left-hand menu of Canvas:
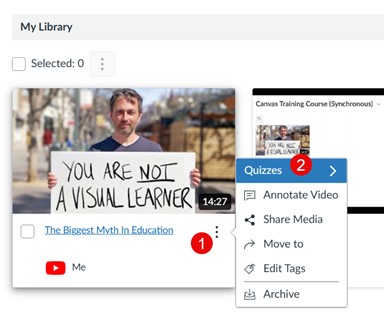
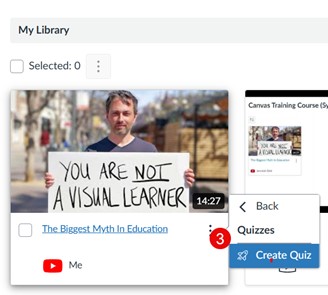
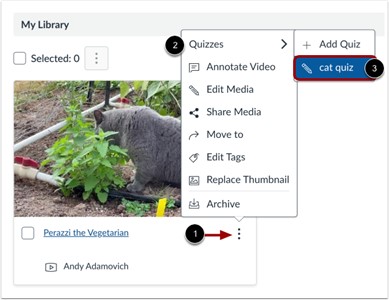
Next, find your desired video, click the three dots next to the title [1], choose Quizzes [2], and then Create Quiz [3]:
Note: Media that already includes a video quiz displays the Quiz icon:
![]()
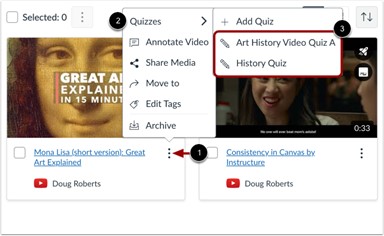
To view the quiz, click the three-dot icon [1], hover over the Quizzes link [2], and then view the name of the created quiz [3].
Creating Canvas Studio Quiz
- Once the desired media has been located on your Studio My Library page, you can create the quiz.
- You can only create Studio quizzes from videos in your My Library page.
- Studio quizzes support Multiple Choice, True or False, and Multiple Answer question types.
- Studio quizzes do not support more than 50 questions in a quiz. Quizzes with more than 50 questions cannot be edited and may not display properly for students.
- Multiple quizzes can be added to a media file.
- If the quiz creation option does not display in Studio, this feature is not enabled in your account. Please contact your admin for more information.
- When you share a Studio video, any quiz created in that video is not included.
- When you copy Canvas course content, quizzes created in Studio do not copy and will need to be re-imported to the new course.
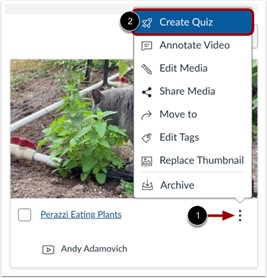
Locate the media where you want to create the quiz. In the thumbnail for the media, click the Options icon [1]. Then, click the Create Quiz link [2].
Add Quiz Details
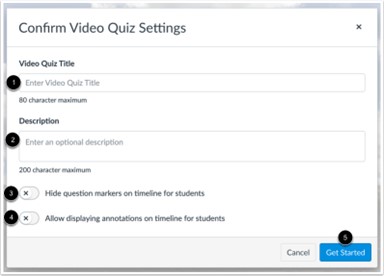
In the Video Quiz Title field [1], enter the name of the quiz.
In the Description field [2], enter an optional description.
To hide question markers in the embedded quiz, click the Hide question markers on timeline for students toggle button [3].
To allow video annotations to display in the quiz timeline, click the Allow displaying annotations on timeline for students toggle button [4].
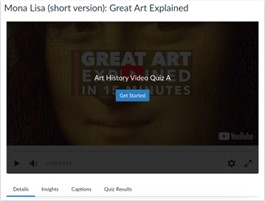
Click the Get Started button [5].
Add Questions

To create a quiz question, click the Add button. The Add button appears when the media is paused.
Note: Studio quizzes do not support more than 50 questions in a quiz. Quizzes with more than 50 questions cannot be edited and may not display properly for students.
Select Question Type
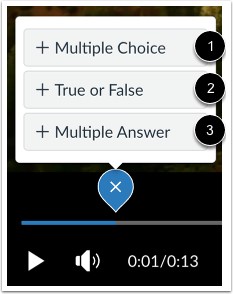
To add a question, click the Multiple Choice [1], True or False [2], or Multiple Answer [3] question type option.
Edit Multiple Choice Question Details
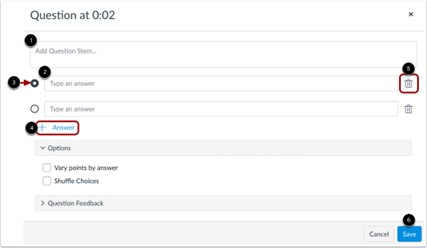
In the Question Stem field [1], add a question stem. The question stem contains the question and, if necessary, additional information.
To add answers to the question, type the answers in the Answer fields [2]. To select the correct answer, click the button next to that answer [3].
To add an additional answer choice, click the Add Answer link [4]. To delete an answer, click the Delete icon [5].
Click the Save button [6].
Vary Points by Answer
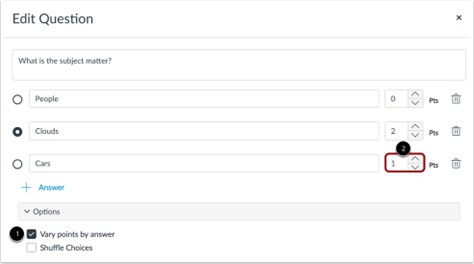
To vary points based on student responses, click the Vary points by answer checkbox [1]. Then, set specific point totals for each answer by entering a value or using the arrows in the Pts field [2].
Shuffle Multiple Choice Answer Choices
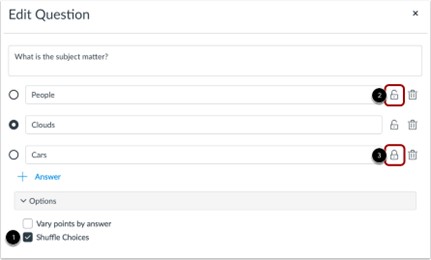
To shuffle answer choices, click the Shuffle Choices checkbox [1]. To lock an answer in its location, click the Lock Distractor Position icon [2]. To unlock a locked answer, click the Unlock Distractor Position icon [3].
Edit True or False Question Details
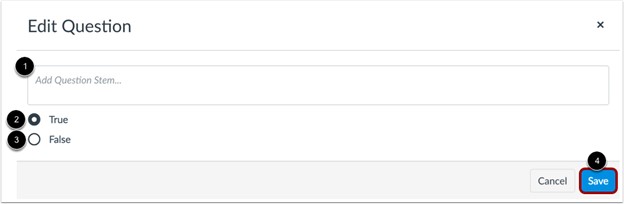
In the Question Stem field [1], add a question stem. The question stem contains the question and, if necessary, additional information.
To select the correct answer for the question, click the button next to the True [2] or False [3] option.
Click the Save button [4].
Edit Multiple Answer Question Details
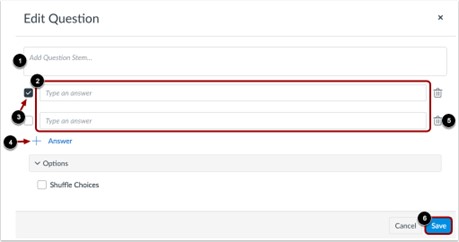
In the Question Stem field [1], add a question stem. The question stem contains the question and, if necessary, additional information.
To add answers to the question, type the answers in the Answer fields [2]. To select the correct answer(s), click the checkbox next to that answer [3].
To add an additional answer choice, click the Add Answer link [4]. To delete an answer, click the Delete icon [5].
Click the Save button [6].
Shuffle Multiple Answer Choices
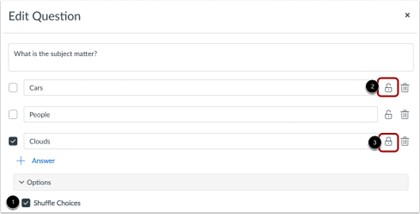
To shuffle answer choices, click the Shuffle Choices checkbox [1]. To lock an answer in its location, click the Lock Distractor Position icon [2]. To unlock a locked answer, click the Unlock Distractor Position icon [3].
Add Quiz Question Feedback
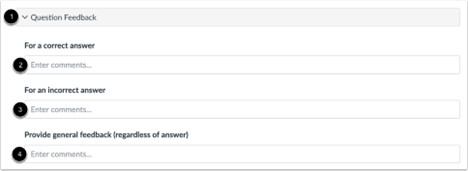
To add question feedback, click the Question Feedback section link [1].
You can enter comments for students to view after taking the quiz. You can enter comments about a correct answer [2], about an incorrect answer [3], or to provide general feedback [4].
View Questions
View the questions in the media indicated by a number [1]. To edit an existing question, click the question number [2].
To review the video quiz questions while the video plays, click the Play button [3].
Return to Media

When you are done editing your video quiz, click the Done button.
Edit Quiz
On the My Library page, locate the media with the quiz. Click the Options icon [1], hover your cursor over the Quizzes link [2], and select the quiz name [3].
Note: Once a version of a quiz has been embedded or taken, it cannot be edited.
Create a Graded Canvas Studio Quiz
To post Canvas Studio video quiz results in the gradebook automatically, the video quiz must be configured as an external tool assignment following the directions in this lesson. Embedding a video quiz in the Rich Content Editor will not post grades to the gradebook.
Please note:
- Studio must be enabled to post quizzes.
- Quizzes must be created from your My Uploads page.
- Once a version of a quiz has been embedded or taken, it cannot be edited.
- When you copy Canvas course content, quizzes created in Studio will not copy and will need to be re-imported to the new course.
Open Create Quiz

In the thumbnail for the media that includes the quiz, click the Options icon [1]. Then, click the Create Quiz link [2].
Open Canvas Assignments
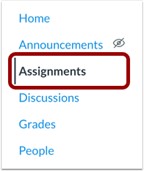
In Canvas Course Navigation, click the Assignments link.
Create Canvas Assignment
![]()
In the Assignments page, click the Add Assignment button.
Add Assignment Details
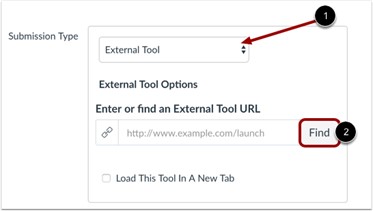
Fill in the assignment details. In the Submission Type drop-down menu, select the External Tool option [1]. To add a video quiz to the assignment, click the Find button [2].
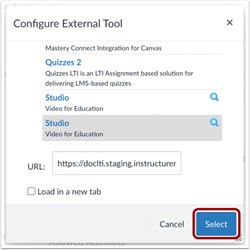
Configure External Tool Assignment
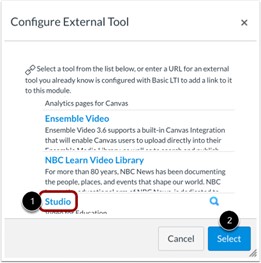
In the Configure External Tool window, click the Studio link [1], and click the Select button [2].
Locate Studio Video Quiz
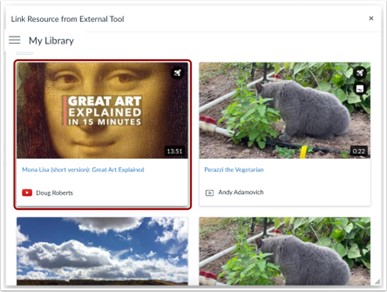
Locate the media with the video quiz and then click the media thumbnail.
Select Quiz
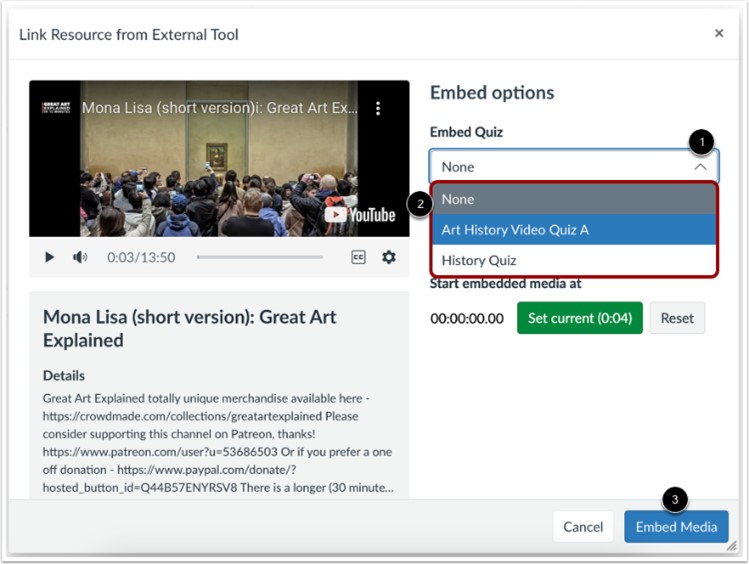
Click the Embed Quiz drop-down menu [1]. Select the quiz you want to embed with the media in the assignment [2], and then, click the Embed Media button [3].
Note: Once you select a quiz from the Embed Quiz drop-down menu, the Display Media Tabs toggle and Start embedded media at fields do not display.
Confirm Quiz
Click the Select button.
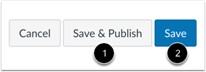
Save and Publish
If you are ready to publish your assignment, click the Save & Publish button [1]. If you want to create a draft of your assignment and publish it later, click the Save button [2].
View Assignment
View the assignment with the added video quiz. Once a student takes the quiz, the grades associated with the quiz are displayed in the Canvas gradebook.
View Gradebook
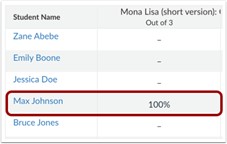
View the student quiz results in the gradebook. Grades are calculated based on the number of questions in the Studio quiz and the Canvas assignment point value.
Canvas Studio Open-Ended Questions
While Canvas Studio Quizzes do not include an open-ended type question, the Studio videos can be embedded within a Text Entry or File Upload question for similar effect.
After creating your Studio video (you can instead use Mediasite, Youtube, or Vimeo as an alternative), navigate to the Assignments area of your course.
From the Assignments area, click the red +Assignment button in the top right to create a new assignment. In the text editor area of your assignment, provide instructions asking students to watch the video, followed by the open-ended question you’d like them to answer.
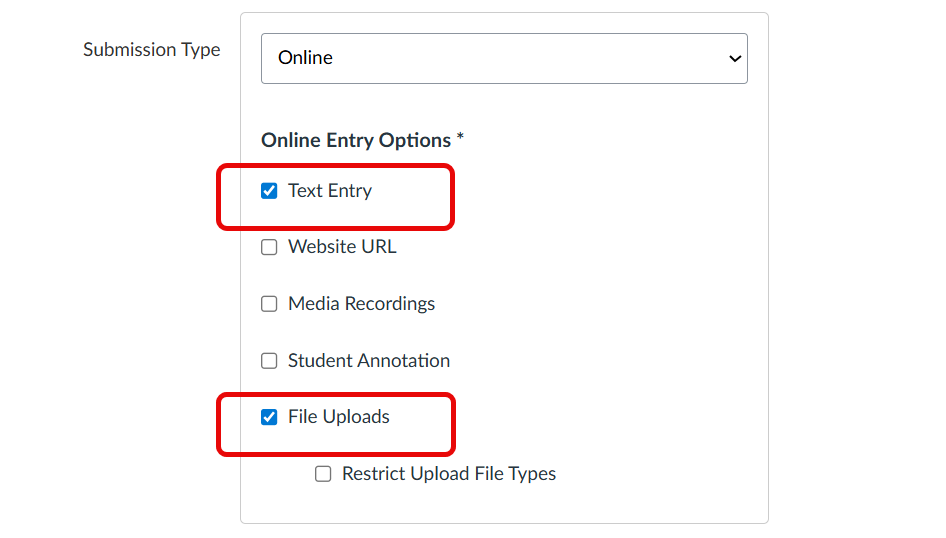
Choose Submission Type
In the Submission Type area, choose Online and select either Text Entry or File Uploads, depending on how you would like students to provide their response:
Open Studio in Rich Content Editor
From the Rich Content Editor area of the assignment. Click the Studio icon [1].
If the Studio icon does not display in the toolbar, click the Options icon [2].
Select Media
In the Studio Embed window, locate the video and then click the media thumbnail.
View Embedded Media
View the embedded media in the Rich Content Editor [1].
You can remove the media from the page by highlighting it and pressing the Delete key on your keyboard.
Publish Media
To publish your Rich Content Editor content immediately, click the Save & Publish button [1]. To save your content as a draft, click the Save button [2].
Canvas Studio Discussion Questions
While Canvas Studio Quizzes do not include a discussion type question, the Studio videos can be embedded within discussions for similar effect.
You can embed a Canvas Studio video or audio file in the discussion details in Canvas.
- Discussions created directly in a group do not include the embed options for Studio media and do not track viewership data. To view the embed options and viewership data when creating a discussion for a course group, the discussion must be created on the course level and then set as a group discussion.
- Once you save or publish the discussion, a copy of the embedded media is saved in Course Collections.
- You can achieve a similar effect by embedding a Mediasite, YouTube, or Vimeo video into your discussion.
Open Discussions
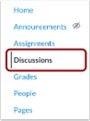
In the Course Navigation, click the Discussions link.
Add Discussion

Click the Add Discussion button.
Create Discussion

Add a title for your discussion in the Topic Title field [1].
To add discussion text content, use the Rich Content Editor [2]. The Rich Content Editor includes a word count display below the bottom right corner of the text box [3].
Open Studio in Rich Content Editor
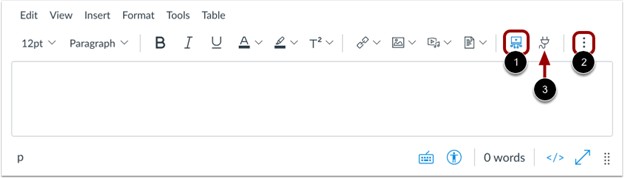
In the Rich Content Editor, click the Studio icon [1].
If the Studio icon does not display in the toolbar, click the Options icon [2].
Note: You can also access the Studio tool from the App icon [3].
Locate Media
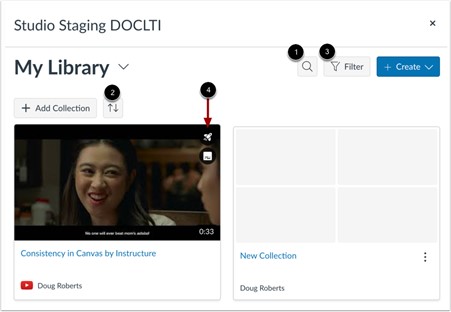
To search for a video or audio file, click the Search icon [1].
To sort by date or name, select the Order drop-down menu [2].
To filter by media type or caption availability, click the Filter button [3].
Note: Media that includes a video quiz displays the Quiz icon [4].
Locate Shared Media
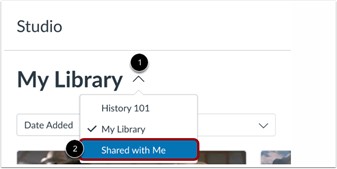
To embed media shared by another user, click the My Library drop-down menu [1]. Then, select the Shared with Me link [2].
Upload New Media
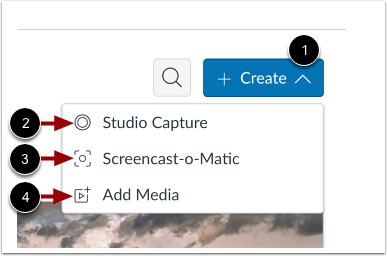
To upload new media, click the Create icon [1].
To record a webcam recording or screen capture using the Studio Screen Capture option click the Studio Capture link [2].
Alternatively, to use Screencast-o-matic to record a screen capture, click the Screencast-o-Matic link [3].
To add a media file from an external link or a file on your computer, click the Add Media option [4].
Note: Only users with Chrome or Edge browsers can embed screen captures and webcam videos using the Canvas Studio Capture feature. Safari or Firefox browser users can upload and embed video in a Canvas discussion.
Select Media
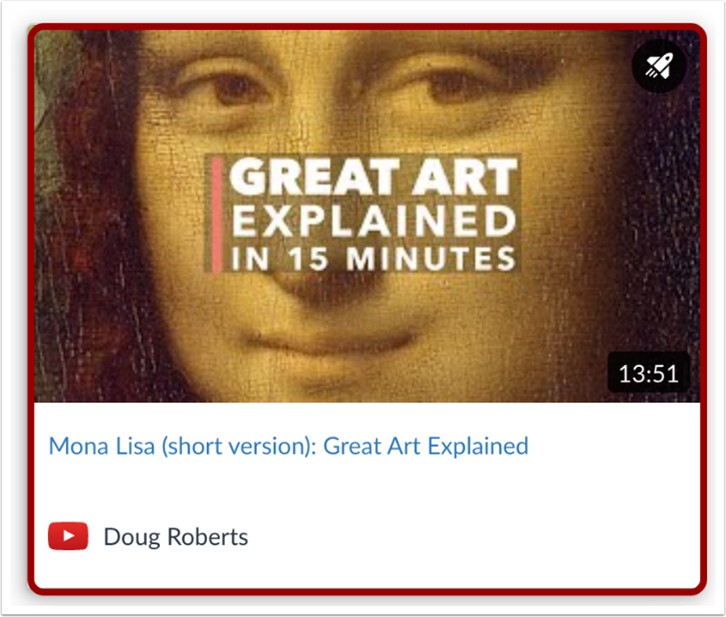
Locate the media and then click the media thumbnail.
Display or Hide Media Tabs
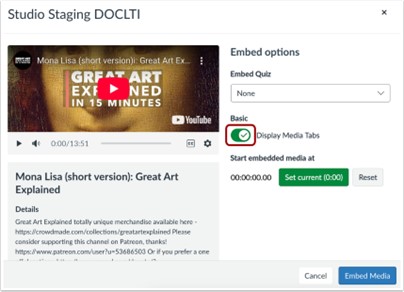
You can display Media Tabs in the embedded media file. The Media Tabs can include the Details, Comments, Insights, and Captions tabs.
To display or hide the Media Tabs in the embedded media file, click the Display Media Tabs toggle on or off.
Note: By default, this option may be on or off. Admins control whether it is on or off by default through Studio Settings.
Set Start Time for Media
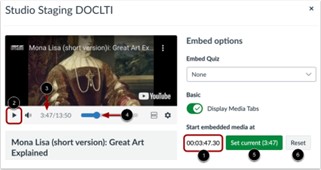
When embedding media from YouTube of Vimeo, you can use timestamp-based embedding. To select the timestamp where the beginning of pertinent content is highlighted on playback, enter it in the Start embedded media at field [1].
Alternatively, you can locate a start time in the media player. To begin playback, click the Start button [2]. The timestamp displays [3]. To navigate through the media, click and drag the time stamp indicator [4]. Then, click the Set Current button [5].
To reset and set a new start time, click the Reset button [6].
Note: Discussions created directly in a group do not include the embed options for Studio media and do not track viewership data. To view the embed options and viewership data when creating a discussion for a course group, the discussion must be created on the course level and then set as a group discussion.
Embed Media
To embed the media in the discussion, click the Embed Media button.
Resize Embedded Media

To resize media, media tabs must be disabled. To disable media tabs, click the Display media tabs toggle off [1]. Then, click the Embed button [2].
Open Studio Media Options
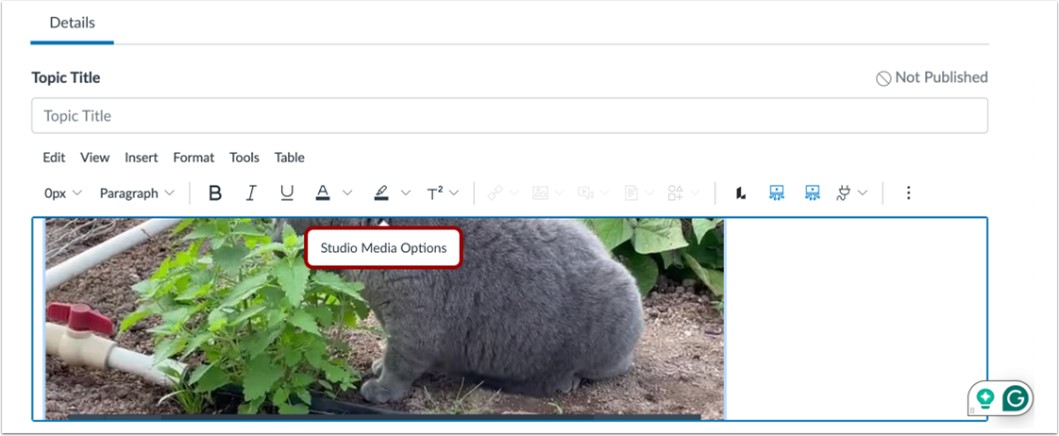
Click in the video window to display the Studio Media Options pop-up. Then, click the Studio Media Options link.
The Studio Media Options tray displays information about the media, including the media title, and display and sizing options.
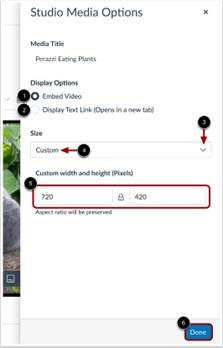
You can customize how the embedded media displays. To embed the video directly in the rich content editor, click the Embed Video radio button [1]. To display a text link to open the media in a new tab, click the Display Text Link (Opens in a new tab) radio button [2].
To select a pre-set size from a list, click the Size drop-down menu [3]. Pre-set size options include medium, large, and extra large.
To enter a custom size, select the Custom option [4]. Enter a custom width or height in pixels in the size fields [5]. As you enter a size, the other field will automatically update to preserve the aspect ratio.
To save the selected options, click the Done button [6].
Note: The media title cannot be edited from the Studio Media Options tray. To edit the media title, view the media details.
Select Discussion Options
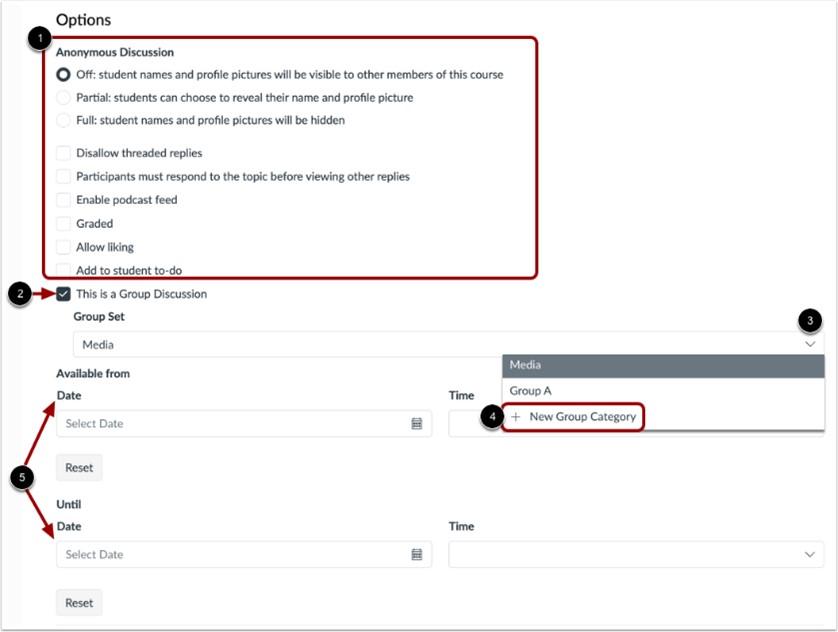
To select options for an anonymous discussion, in the Anonymous Discussion section, click the appropriate radio buttons and checkboxes [1].
To allow group discussions, click the This is a Group Discussion checkbox [2].
To select an existing group set, click the Group Set drop-down menu [3]. To create a new group category, click the New Group Category link [4].
To set availability dates for the media, use the Date and Time fields [5].
Save and Publish
If you are ready to publish your discussion, click the Save & Publish button [1]. If you want to create a draft of your discussion and publish it later, click the Save button [2].
Publish Draft
To publish a saved draft, click the Publish button.
View Results of Studio Quiz
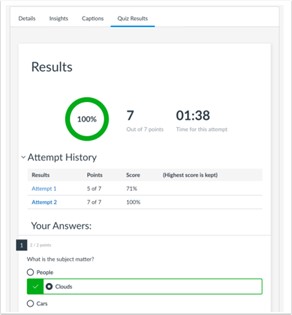
Instructors, TAs, designers, and Studio account admins can view quiz results. Users can view their individual quiz results.
Note: Once a Studio video quiz has been taken, edits made to the video quiz by the creator will not apply to any pre-existing embedded quizzes that have submissions. New embeds of the edited video quiz will show the updated version of the video quiz.
RaiderCanvas Support
-
Phone
806-742-5944 -
Email
online@ttu.edu