
Training & Resources
Financial Transactions System (FiTS)
Table of Contents
- What is FiTS
- Access to the System
- Inactivity Logout
- Creating a Cost Transfer
- Step 1 - Create a Cost Transfer
- Step 2 - Questions, Attachments, Comments
- Step 3 - Finish
- Status Screen
- History Screen
- Creating a Revenue JV
- Step 1 - Create a Revenue JV
- Step 2 - Questions, Attachments, Comments
- Step 3 - Finish
- Creating an Intra-Institutional Voucher (IV)
- Step 1 - Creating an IV
- Step 2 - Attachments & Comments
- Step 3 - Finish
- Approving/Rejecting a Request
- Error Checking
What is FiTS?
The purpose of FiTS (Financial Transactions System) is to allow users to electronically submit and process documents within three modules: cost transfers, revenue journal vouchers, and intra-institutional vouchers (IVs). Cost transfers are initiated for the transfer of an expense in full or part from one FOP to another. Revenue JVs are initiated to move revenue from the department revenue clearing fund to the appropriate FOP that generated the revenue and may also be used to record a reimbursement for an expense (usually tax). Finally, IVs are initiated by a revenue center to charge another TTUS/TTU/TTUHSC department for goods or services.
This electronic system will be required for all cost transfers, revenue JVs and IVs with the exception of cost transfers to re-classify (change) the account code or those which involve multiple chart of accounts (these requests will need to be submitted with all approvals via electronic forms.) and approved System IDs processing transactions via Gateway.
Access to the System
The URL to the system is http://FiTS.texastech.edu/ or may be found by clicking on the FiTS link under the ‘Finance’ section of the ‘A&F Work Tools’ tab in Raiderlink. Access to the system to process cost transfers and/or revenue journal vouchers is available to any employees with an active eRaider account. Users must request special access to process IVs. This request should be sent to accountingservices@ttu.edu. The request should include the revenue FOAP, user’s Oracle ID, and approval from the revenue organization manager or an alternate approver (as defined in TeamApp).
Inactivity Logout
The system automatically logs a user out who has been idle for over 35 minutes. A session clock is always visible in the upper right-hand corner of the screen.
Creating a Cost Transfer
Step 1 - Create Cost Transfer

After clicking on the ‘Create New Cost Transfer’ tab, the system will display two panels. The top panel allows the user to search Banner transaction history to select specific charges to be moved to a different FOP. The search results are limited to operating expenses (account type 70s). Movement of salary expenses (account type 60s) requires a Job Labor Change Form.
This section allows for a number of options to search for transactions, which include: Chart of Accounts, Fund, Organization, Account, Program, Document ID, and Transaction Amount (range). A Chart of Accounts must be selected. After which, there are a number of combinations of parameter choices to make finding the document(s) you need easy:
- Fund code and/or Organization code (along with any additional fields you choose).
- Account code and/or Program code (you must first specify a Fund or Organization).
- Document ID (you may enter all or a portion of the Document ID for searching).
- Transaction Amount (you must first specify at least one of the above).

After inputting your search criteria, you will use the Search button to display results. There is also a second option to Clear Search, which clears any prior entries you have made.
After completing a search, you will either receive a message that no documents were found for your criteria, or you will be provided with a list of documents that you may choose to transfer.
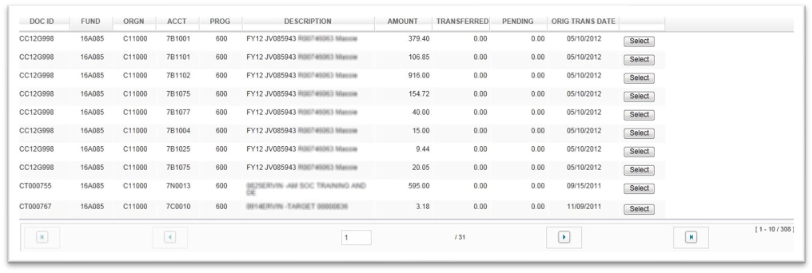
The results will display the resulting Document ID(s), FOAP(s), Transaction Description(s), Transaction Date(s), and three Amount fields:
- Amount – Original transaction amount.
- Transferred – Portion of the original amount that has already been transferred to another FOAP.
- Pending – Portion of the original amount that has been requested to be transferred to another FOAP and has not yet posted.
The list will default to show 10 records at a time but will also display the total number of search results in the lower right-hand corner of the top panel. You may use the left and right arrow buttons to navigate to the previous or next 10 records or move to the first or last set of results. Your results may be sorted in ascending or descending order for any column by simply clicking on the column’s header.
For each transaction you wish to cost transfer, you will click the Select button to the right of the transaction. It is not suggested to select transactions from multiple Funds or Organizations on one request, as this may increase the number of approvals needed and delay posting time.)
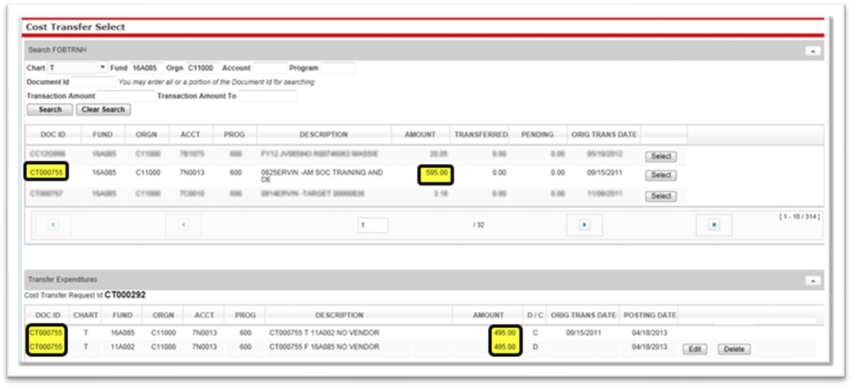
When a transaction is selected, it is populated in the lower panel (example below). This lower panel serves as the cost transfer request that will be posted to Banner (after meeting approval requirements). The original expense details are provided on the first line, and the second line enables the user to enter the transfer FOP information.

- The Document ID of the original document is displayed in the left-hand column.
- A unique ‘Cost Transfer Request ID’ (a.k.a. “FiTS ID”) is generated each time a new request is started in the system. This ID may be used to search for the document on the History tab after it has been fully processed and posted to Banner Finance. This ID is specific to FiTS and is different from the new document ID that will be assigned when posting the document to Banner (CX#).
- A document description is pre-populated and includes the original transaction’s Doc ID, the fund the charge is being moved (To or From), and vendor information (if applicable). If the cost transfer involves a grant or cost share fund, this description will also reference the reason code, or purpose of the transfer (chosen on Step 2 – Questions, Attachments and Comments). The reason code will apply to the entire request and, as such, will be appended to all lines of the description.
The user will then select Edit to edit each line to provide the new FOP information of where each charge will be transferred (see below). The next field allows you to input the amount you would like transferred to the FOP you have entered. (This amount – combined with any other pending or posted cost transfers associated with the selected document - may not exceed the original transaction amount.) Once you have completed all fields, you will click Save and continue editing any additional lines. A Cancel button is also available to clear any entry you have made.

In the example below the top panel shows an original posted expenditure for 595.00, and the bottom panel shows 495.00 of this amount being transferred from 16A085 to 11A002. You may also see the reference of the original transaction’s Document ID:
If you decide you no longer want to process a certain transfer in the lower panel, a Delete button is available to remove this portion of the cost transfer request.
*Note: If your Cost Transfer only has one transaction selected and you delete the line, the entire request will be deleted, including any question answers, comments, etc., and you will need to ‘Create a New Cost Transfer’.
Step 2 - Questions Attachments Comments
After your lower panel contains all cost transfer requests you wish to process, you will click on the second tab ‘Step 2 – Questions Attachments Comments’:

This tab enables the user to provide important justification, comments, or attach documents for all approvers to review the request and may be mandatory for certain types of cost transfer requests. The first section under Step 2 is the ‘Questions’ section. Begin by clicking on the Edit Answers button which will open up text boxes to answer each of the required questions.
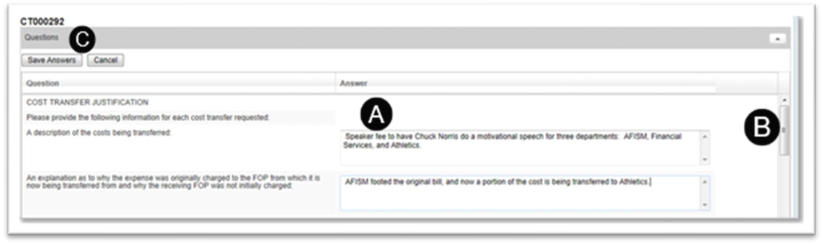
- Text boxes to allow answering all questions.
- Be sure to use the scroll bar to answer all questions in the list before saving your answers.
- After completing all answers, choose the Save Answers button or click Cancel to remove any answers you have already provided and return to Step 1.
*Note: If a grant or cost share fund is the To/From fund on a cost transfer and the original document is greater than 90 days in the past, additional questions will need to be answered on tab “Step 2”. A Department Chair and Financial Manager must approve in addition to the normal approval routing for these late transfers. Please refer to TTU OP 65.04 ‘Cost Transfers Involving Sponsored Projects and Cost Share Funds’ for more guidance.
The second section under Step 2 is the “Reason Codes” section.
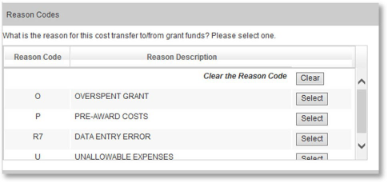
This section is required when the cost transfer is moving costs to or from grant or cost share funds. Based on the justification for the transfer of costs, you will select the most appropriate reason by clicking the Select button. The reason code will apply to the entire request and populate on the transaction description for each line in Step 1.
The third section under Step 2 is the ‘Attachments’ section. This section allows you to attach one (or multiple) supporting documents for your request. The allowable file formats are as follows: CSV, DOC, DOCX, PDF, RTF, TEXT, XLS, XLSX and XML
After clicking Upload Attachment, you will be prompted to choose the file you would like to attach and click Open. You will then see the file you selected in the Attachments panel (see next page for screenshot). This process may be repeated for multiple attachments.
*Note: Attachments may not exceed 5mb in size and may not contain any confidential or Personal Health Information (PHI) governed by HIPPA regulations.
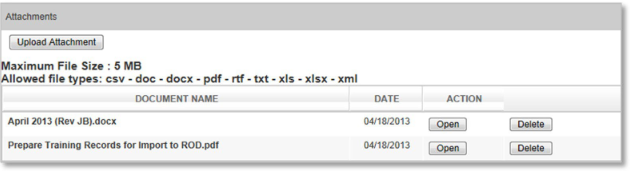
An Open button is available to view the document you have attached, or you may choose to remove an attachment using the Delete button. Once all approvals have been acquired and the document has posted to Banner, attached documents may not be deleted
The final section under Step 2 is for adding ‘Comments’. You may add any additional
information you wish to provide to the cost transfer request and click on Add. After
each comment is saved, it is moved to the ‘Comment’ pane to the right (see below).
You may
review the comment in full by clicking on it and a dialog box displaying the full
comment, who entered the comment, and what date the comment was entered will be shown.
Comments may also be removed using the Delete button next to the comment.

Step 3 - Finish

After answering all questions and attaching any supporting documents and/or comments, you are ready to move on to Step 3. This step allows you the option to Clear your request. Doing so will retain the FiTS ID of the request with a status of “Started” so you may return to work on it later. This option does save all work done on the request at the time the button is clicked. You may also mark your document as complete with the Complete button, which saves all work, verifies all information entered and sets the request status to “Complete”. Lastly, you may submit your request to approvals with the Approvals button. This option sets the status to “Submitted” and notifies approvers that the request is available for their review and approval.
A display of all required approvals is shown after a document has been submitted. This is the same screen approvers will see when using the hyperlink in the approvals email to view and approve/reject the cost transfer request.
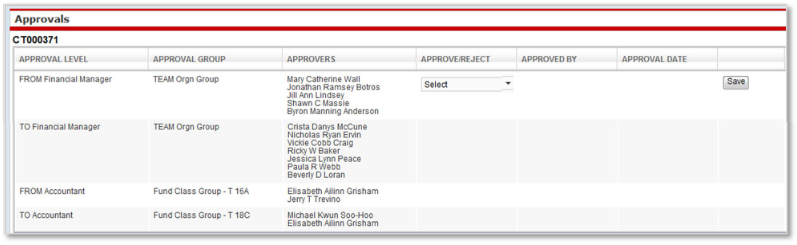
*Note: Cost transfers involving grant or cost share funds require Principal Investigator approval per OP 65.04. In the event it is necessary for an alternate approver (found in TeamApp) to approve a cost transfer in FiTS, an email indicating PI approval of the FiTS transaction will be required to be uploaded and attached in order to process the cost transfer.
Status Screen

The ‘Status’ tab in FiTS serves multiple purposes but primarily allows the user to view any request in the system and the current status of the request. This screen provides multiple ways to search for the document and by default displays a list of documents you originated or are one of the required approvers.

Users may search using similar criteria as in Step 1 of Creating a Cost Transfer:
- Fund code and/or Organization code (along with any additional fields you choose).
- User Name (best to type in the full first and last name). A drop-down list will display your results, and the intended user may be selected.

- FiTS ID (this ID will begin with “CT” for all cost transfer requests and exists only within FiTS).
- Date (From and To). Users have the option to use the calendar to choose dates.
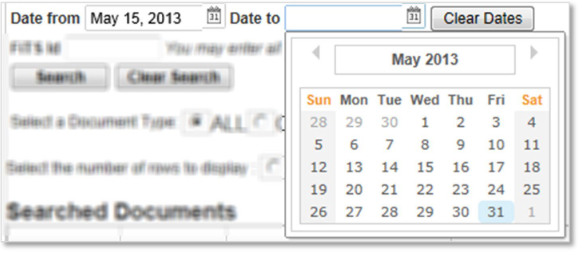
- The Document Type – ALL, CT, IV, RT, or PT (HSC only).
Your search results (or the defaulted list of requests) will each have a status. Each request will have one of the following possible statuses:
- Started – The request has been initiated by the originator but has not yet been marked
as complete or sent for approvals.
- The originator may Edit or Delete the request.
- Completed – The request has been finalized and marked as complete by the originator
and verified to contain no errors (it is ready to be submitted for required approvals).
- The originator may edit, delete, or submit the request for approvals.
- Submitted – The request has been completed, verified, and submitted for the appropriate
required approvals.
- The request may no longer be edited or deleted by the originator, but anyone involved with the request may review it.
- Rejected – The request has been rejected (sent back to the originator) by one of the
required approval levels.
- The originator is notified by email and may choose to Edit or Delete. Essentially, the request is back to a “Started” status after it has been rejected.
- Errors – In rare instances, errors may occur when the document has received all approvals
and is trying to post to Banner.
- The original request will not post to Banner. The originator is notified by email and may choose to Edit or Delete the original request. Essentially, the request is back to a “Started” status after it has been rejected. Upon reopening the request, the originator will see a comment automatically logged by the system indicating that the request experienced errors. This comment may assist the user in resolving the error so they may resubmit the request. In rare cases users are unable to correct the error. In these cases, please contact accountingservices@ttu.edu with the document ID for assistance.
History Screen

The ‘History’ tab in FiTS is designed and operates very similarly to the ‘Status’ screen, only it displays requests which have been finalized and sent to Banner for posting.
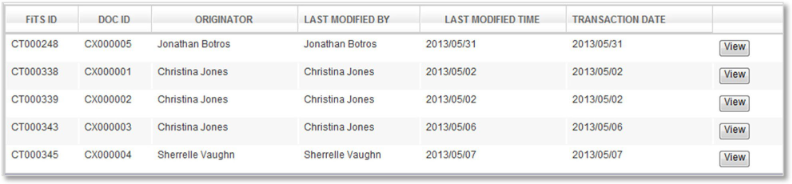
Two new fields are now visible for your reference:
- Doc ID – Shows the Document ID used to post to Banner Finance (different from the “FiTS ID,” which is specific to this system).
- Transaction Date – The date the transaction was posted to Banner Finance.
A View button is available from the ‘History’ screen, which will navigate the user back through the original screens to review the request, comments, approvals, etc. No changes may be made to the document as this is a historical view only.
Creating a Revenue JV
Step 1 - Create Revenue JV
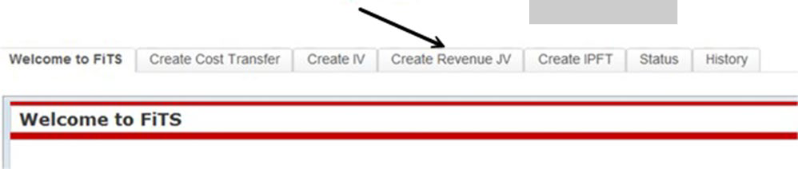
A Revenue JV is used to move deposited funds (TC# document) from a departmental revenue clearing fund and balance sheet account (2A0) to a departmental FOAP as revenue (5x). After clicking the “Create Revenue JV” tab, the system will open up the search feature to search posted Banner Finance transaction history for revenue documents that are available to move. After choosing the chart and entering the fund, the user has various search options. A search may be conducted on any combination of the available options. The search below will return all available transactions for the fund and account. To limit the data returned and time searching, the user should enter a date range.
- A search on Fund, Account, and Date range will return multiple transactions available to select. A multiple-line revenue JV may be entered for several TC documents.
- A search on Fund, Account, and Document ID will return a specific transaction and will only return the specific transactions associated with the Document ID.
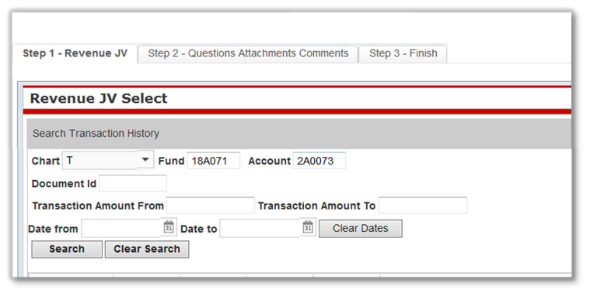
After clicking “Search”, the results of the search will return and are available for selection.
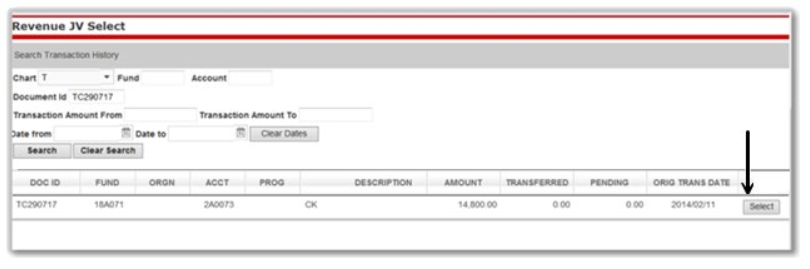
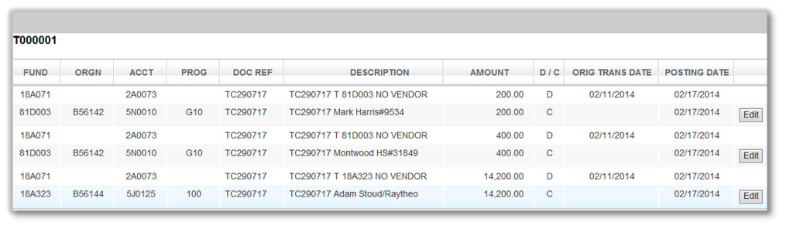
Once selected, the revenue transaction is created and assigned a FiTS identification number beginning with “RT”. Click “Edit” to enter the FOAP and description information.

Enter the FOAP and description desired by the user. A default description will populate, but the user may wish to provide more detail. This description will pull into Cognos reports. The user will also enter the amount to be credited to each FOAP entered. Multiple FOAPs may be used for one TC revenue document. Click “Save” when done with each credit entry.
To use multiple FOAPs: Select the TC document, Edit, and enter the FOAP and credit
amount for that FOAP. Click Save. Then Select the TC document from the list at the
top again, Edit, and enter another FOAP and the credit amount. Continue this process
until all
of the TC document amount has been recorded.

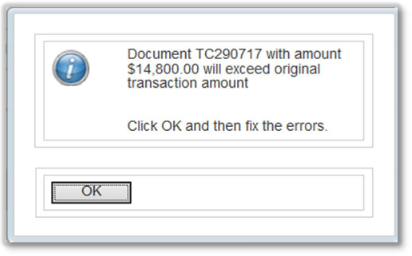
If the total of all credits entered is more than the TC document, the user will receive an error message. You will be required to correct the amount before the system will save the transactions.
Below is an example of an entry to move all revenue deposited into the clearing account for one TC document split between multiple FOAPs.
Step 2 - Questions Attachments and Comments
When the user is done entering revenue transactions, click on Step 2 to access the attachments and comments section. The user may upload documents to support the revenue transactions. Supporting information will need to be uploaded for a reimbursement of an expense. Comments may be entered as well.

Step - 3
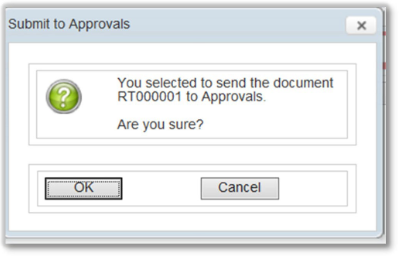
Click the Finish tab for options regarding the transaction. The user may select one of three options – started, complete, or approvals. “Approvals” must be selected for the transaction to submit to the appropriate approver.

The user will verify that document is to be submitted for approval.
Helpful Tips:
Gifts (5L0001) should only be posted by Institutional Advancement and should not be
deposited into a department revenue clearing fund. These monies should be sent to
Institutional Advancement for donor acknowledgement and depositing. If gift money
has been deposited into a department revenue clearing fund, please stop and contact
Institutional Advancement at IA.Financial@ttu.edu.
All grant revenue received from a sponsoring agency should be sent to Accounting Services
to be recorded in Banner Finance. However, grant related income/program income may
be applied using FiTS by transferring from a departmental revenue clearing fund into
the 28P fund assigned to a specific grant ID earning this revenue.
Creating an IV
Step 1 - Creating an IV

After clicking on the “Create IV” tab, the system will require you to select a System ID from a drop down menu. Users will only be able to see ID’s they are authorized to use. If you do not see the System ID you need please contact accountingservices@ttu.edu. An ID must be selected to proceed.
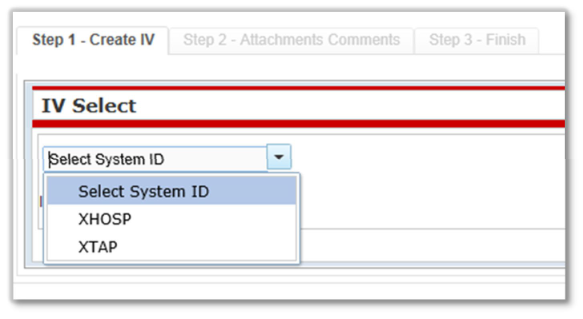
Once an ID has been selected, the rest of the Step 1 pane opens up. OPTIONAL: If you are using a template, the user may select his/her name from the drop-down screen immediately below the System ID. The user may then also select a saved template from the third drop down box or may proceed without selecting a template.

Notice the “Non-Inter Chart” and “Inter Chart” buttons. Non-Inter Chart is the default. If the user entering an Inter Chart IV (using 2 different chart codes), the Inter Chart Button may not be selected until after the first revenue entry has been made and prior to completing the document.
The user will then begin to fill out the required revenue sections. Once the first line has been completed, the user will need to click the “Add” button.

Once you click on “Add”, the pane opens with more options:
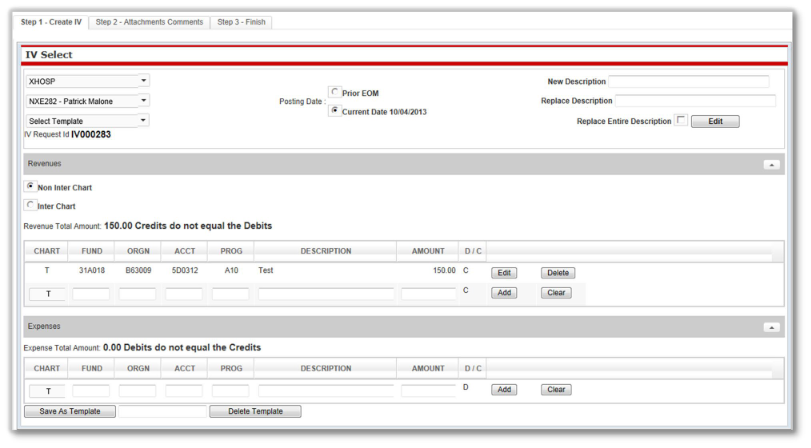
- Posting Date: During the first 10 days of each month, users may choose to post the IV into the prior month or into the current month. Once the 10th has passed, only the current month may be selected.
- Description: The user may change the description to provide clearer and more concise details that represent the transaction. The new description must not exceed 35 characters, including spaces.
- Inter Chart Transactions: If a transaction will be inter-chart (involving more than
one chart), the Inter Chart button must be selected after the first revenue line has
been entered.
- Note: For inter-chart transactions, the revenue line will default to $0.00 until the expense FOAP information is added.
- Transaction Total Not Balanced: FiTS provides a status showing the balance of credits and debits when they are not equal. FiTS will continue to display this message until the two are balanced. The IV will not be allowed to post until the transaction is balanced.

Screenshot below shows a document once all lines have been entered and the document is balanced and ready to be completed:
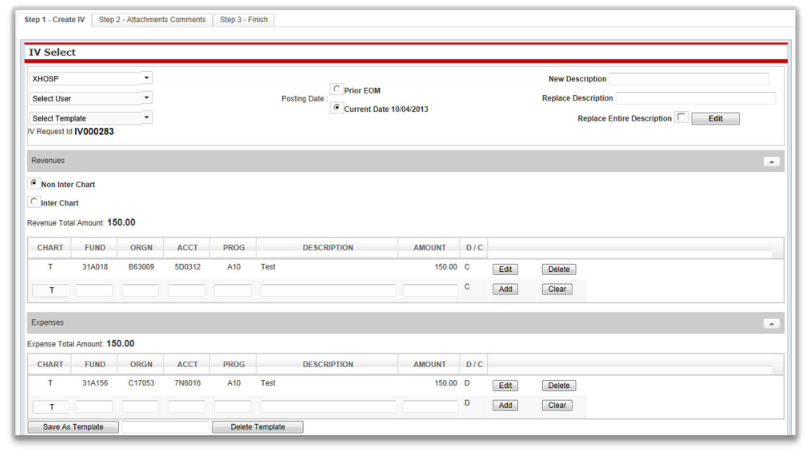
OPTIONAL: At this point, the user may choose to save this as a template for future
use. This will be the most efficient manner of processing IVs if the user will be
entering recurring transactions weekly or monthly. The “Save as Template” button will
then ask the user to name the template, and it will appear in all future logins under
the “Select Template” drop down box at the top of the pane. The
user may also delete a template by selecting the “Delete Template” button. Note: Templates
may be seen by all users accessing that specific System ID.
Step 2 - Attachments & Comments
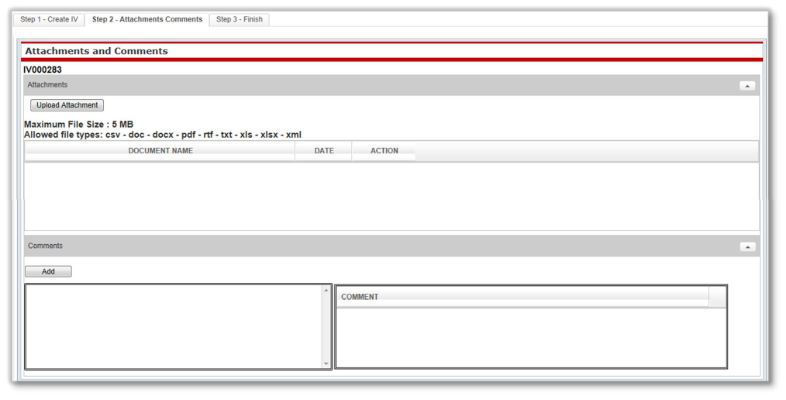
This section for IVs is similar to the section for Cost Transfers. However, IV’s have no questions that are required to be answered before the user may proceed.
Users are required to attach the invoice/other documentation providing approval to charge the expense FOP.
Step 3 - Finish
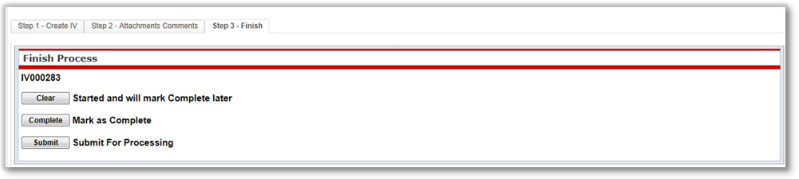
IV’s do not require approval. The “Finish” tab allows the user to:
- "Clear" the IV, which will leave the IV started but not completed.
- "Complete" the IV, which will mark the IV as complete but will not submit it for processing.
- "Submit" the IV, which will send the transaction to be loaded into Banner.
Once the document has been loaded into Banner, the transaction will be assigned a document ID beginning with the prefix specifically designated for the particular System ID. The user will be able to search history in FiTS using either the FiTS ID (IVxxxxxx) number, or the Banner document ID. You may refer to the Document Prefix Identifier list for more information on System IDs and document prefixes.
Approving/Rejecting a Request
Cost transfer and revenue JV FiTS requests require approval from an organization financial manager or approved alternate approver authorized in TeamApp. Following approval from each transaction line’s Organization financial manager/approver, the request is submitted for final review/approval by Accounting Services.
*Note: Cost transfers involving grant funds require Principal Investigator approval per OP 65.04. In the event it is necessary for an alternate approver designated in TeamApp to approve a cost transfer in FiTS, an email indicating PI approval of the FiTS transaction will be required to be uploaded and attached in order to process the cost transfer.
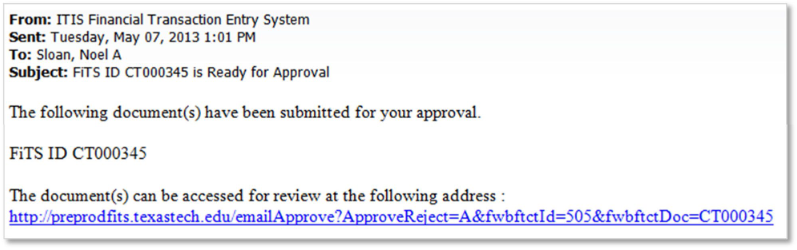
After a transaction has been submitted for approvals by the originator, the first level of approvers are notified of the pending request via e-mail. In addition, a link is provided to the approver which will direct them to the ‘Status’ screen. The e-mail will also include the FiTS ID of the document they need to review. An example of the e-mail notification to approvers is shown below:
After following the link, the approver will find the request in their defaulted list and click Review.
They may also find the request by using the FiTS ID search box
The approver is able to review the request including the transactional information (Step 1 tab), comments, attachments, questions and responses (Step 2 tab), and/or prior approvals (Approvals tab).
Approvers will navigate to the ‘Approvals’ tab and use the ‘Approve/Reject’ drop-down box and click ‘Save’.

Approving a Request
To approve a document, choose ‘Approve’ from the drop-down box and click Save. The transaction will be marked as ‘Approved’ for this level, notating the approver’s name and the date. The next group of approvers are sent an e-mail stating the request is ready for their review.
Rejecting a Request
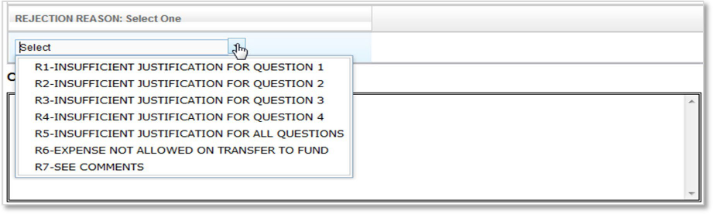
If an approver chooses to ‘Reject’ a transaction, a new dialog box will appear below the Approvals section. A “rejection reason” should be chosen from the drop-down list. Additional information may be added to the comments box. Be sure to provide all rejection information before clicking Save.
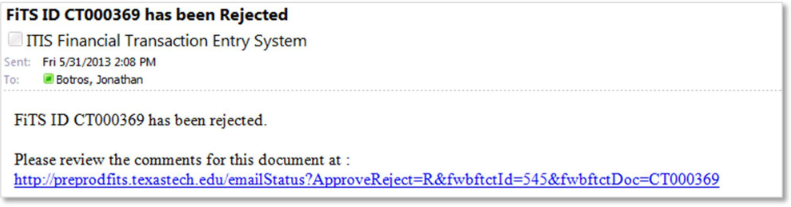
The originator of a request is notified by e-mail if their cost transfer or revenue JV is rejected. See below for an example of the e-mail notification:
Rejection comments are logged in the Comments tab, so the originator may review and resubmit the request.
Adding an Approver
An originator or approver has the option to add an additional approver(s), beyond those already required by FiTS. To do so, the user may type the additional approver’s name into the dialog box below the ‘Approvals’ section, choose their name from the drop-down list, and click Add Approver.
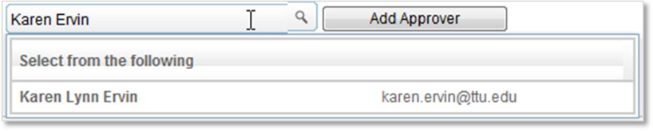
Once the additional approver has been added, you will see their name added to the list of required approvals. They will be notified by e-mail when the request is in their approval queue.
FiTS Error Checking
The system includes many elements of “error checking” to ensure only valid requests are submitted for approval.
Examples of these include verification that “budget available balance” (or “BAVL”) is sufficient to support the cost transfer request. For example, a user who tries to move an expense on to a FOAP which does not have sufficient budget will see an error similar to the one below (A), or if a transfer request would exceed the amount of the original transaction including all prior cost transfers (B):
A)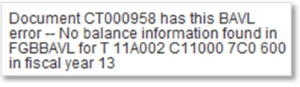
B) 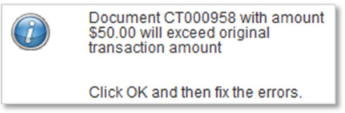
Other examples of error checking provided by the system are: verifying a transaction is not entered with a 0.00 amount (C), verifying all required questions have been answered (D), and a valid FOP combination/valid index has been entered (E):
C) 
D) 
E) 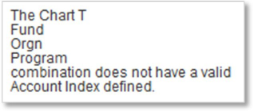
Accounting Services
-
Address
TTU Plaza Building, 1901 University, Suite 308, Lubbock, TX 79411 -
Phone
806.742.2985 | Fax: 806.742.8076 -
Email
accountingservices@ttu.edu