
Using Visual Studio Code on HPCC with CS Bridge
This guide explains how HPCC users can launch Visual Studio Code on a Slurm-allocated compute node using the CS Bridge extension. The workflow keeps interactive development work off the login node and places it inside a scheduled compute allocation.
| Local requirement | Visual Studio Code 1.98 or newer, OpenSSH, Remote - SSH, and CS Bridge. |
| Cluster requirement | An active HPCC account and access to a Slurm partition. |
| Connection model | Local VS Code → HPCC login node → Slurm allocation → compute node via CS Bridge / Microsoft Dev Tunnel. |
1. How the connection works
CS Bridge is a Visual Studio Code extension designed for Slurm-based HPC clusters. Instead of attaching VS Code directly to a login node, it submits a Slurm job, waits for a compute node to be allocated, starts its remote helper inside that allocation, and then opens a VS Code window connected to the compute node.
Connection flow:
Local VS Code → SSH login host → Slurm job → allocated compute node → Microsoft Dev
Tunnel → Remote - SSH attach.
Important: Use the login node only as the cluster entry point. Do not use a normal Remote - SSH session on the login node for compute-intensive development. CS Bridge is intended to move the VS Code workload into a Slurm allocation.
2. Prerequisites
- An active HPCC account and credentials.
- A supported local operating system: Windows, macOS, or Linux.
- Visual Studio Code version 1.98 or newer.
- An SSH client on the local workstation (command-line tool / terminal /MobaXterm)
- The Microsoft Remote - SSH / Remote Development extension for VS Code.
- The CS Bridge extension by CyberShuttle on VS Code.
- A Microsoft account for CS Bridge Dev Tunnel authentication. ( Your Texas tech Credentials)
- Network access to the HPCC login host. Use the normal university network/VPN requirements applicable to your account and location.
3. Install the required VS Code extensions
3.1 Install Visual Studio Code
- Install the current supported version (1.98 or higher) of Visual Studio Code on your workstation.
- Open Visual Studio Code after installation completes.
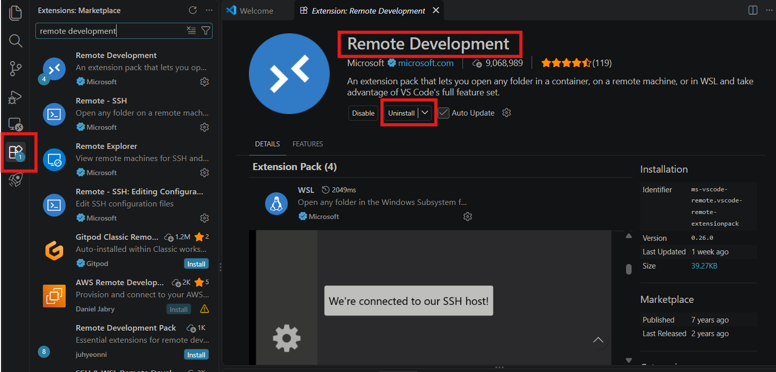
3.2 Install Remote - SSH
- Open the Extensions view using Ctrl + Shift + X (Windows/Linux) or the Extensions icon in the Activity Bar.
- Search for "Remote - SSH".
- Install the extension published by Microsoft. If Remote - SSH does not appear individually, install Microsoft’s "Remote Development" extension pack, which includes Remote - SSH.
- Press Ctrl + Shift + P and confirm that "Remote-SSH: Connect to Host..." is available.
3.3 Install CS Bridge
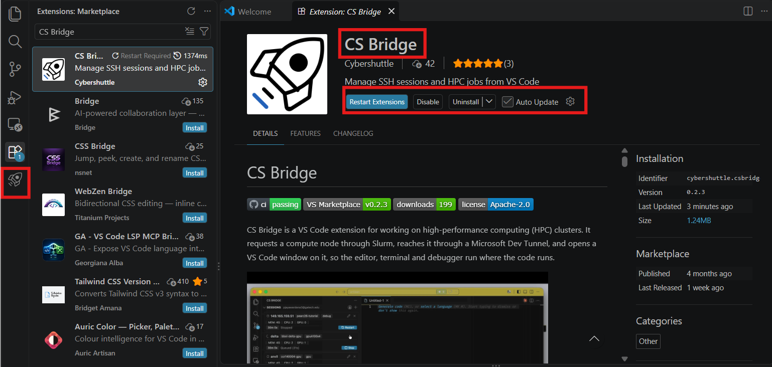
- Open the Extensions view again.
- Search for “CS Bridge”.
- Install “CS Bridge” published by CyberShuttle.
- After installation, a CS Bridge icon appears in the VS Code Activity Bar.
4. Configure the HPCC SSH host
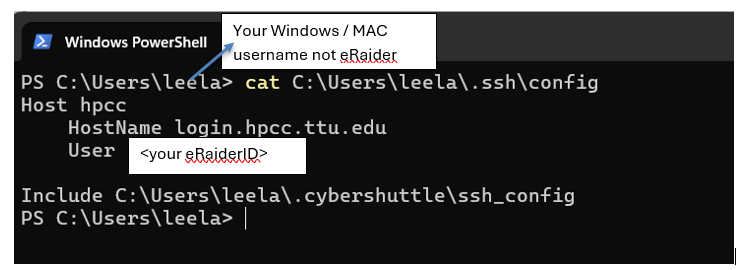
CS Bridge reads cluster hosts from your normal OpenSSH configuration.
On Windows, the file is typically located under your user profile:C:\Users\<WindowsUser>\.ssh\config
On Linux, the file is typically located under your user profile:
/home/<LinuxUser>/.ssh/config
On Mac, the file is typically located under your user profile:
/Users/<MacUser>/.ssh/config
Add an HPCC host entry similar to the following. Replace <eRaiderID> with your HPCC username:Host hpcc
HostName login.hpcc.ttu.edu
User <eRaiderID>After CS Bridge initializes, it may also add an Include line for its generated per-session SSH entries. Keep this line if present:
Include C:\Users\<WindowsUser>\.cybershuttle\ssh_config # For Windows Users
Include ~/.cybershuttle/ssh_config # For Linux or MAC Users
Note: Do not manually edit the generated CS Bridge ssh_config file unless directed by HPCC support. CS Bridge manages that file for individual sessions.
5. Validate normal SSH connectivity
Before using CS Bridge, confirm that your workstation can reach HPCC using the SSH
alias you configured.
- Open PowerShell, Terminal, or another local shell.
- Run
ssh hpcc hostname
- Authenticate with your HPCC credentials when prompted.
A successful connection returns the hostname of an HPCC login node, for example:login-20-25.hpcc.ttu.edu or login-20-26.hpcc.ttu.edu
If command-line SSH does not work, correct the SSH/network issue before continuing. CS Bridge depends on the same SSH path.
6. Open CS Bridge and sign in
- Open a normal local VS Code window.
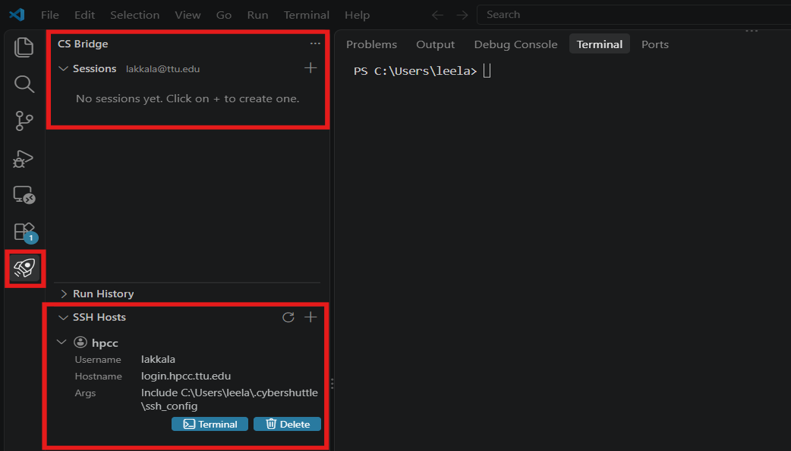
- Select the CS Bridge icon from the Activity Bar.
- Under SSH Hosts, confirm that the "hpcc" host appears and shows login.hpcc.ttu.edu as the hostname.
- Select "Not Signed In" and sign in with a Microsoft account ( Texas Tech Credentials)
when prompted.
This account is used to authenticate the Microsoft Dev Tunnel used by CS Bridge. - After authentication, return to the CS Bridge panel.
7. Create a Slurm-backed VS Code session
- In the CS Bridge panel, click the + icon next to Sessions.
- Choose the HPCC SSH host.
- Select the Slurm partition and resources needed for your work.
Example test Configuration:Partition Nocona CPUs 2 Memory 4 GB Walltime 30 Minutes GPU None ( For a CPU-only Session) 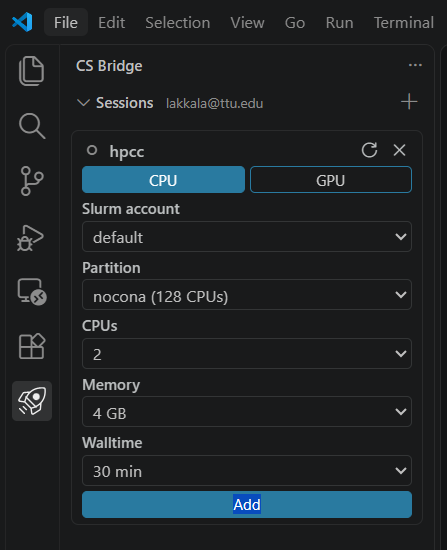
Resource guidance: Request only the resources you expect to use. The current CS Bridge form enforces a minimum of 2 CPUs and 4 GB for a session.
CS Bridge generates and submits a Slurm batch script. A typical job created from the example above contains directives equivalent to:
#SBATCH --nodes=1
#SBATCH --ntasks=1
#SBATCH --cpus-per-task=2
#SBATCH --mem=4GB
#SBATCH --time=00:30:00
#SBATCH --partition=nocona
8. Start and connect to the session
- Add/create the session after selecting the desired resources.
- Review the Slurm job script preview, if shown, and confirm the partition, CPU, memory, and walltime values are correct.
- Select Start and then select Submit Job. CS Bridge submits the Slurm job through the
login node.
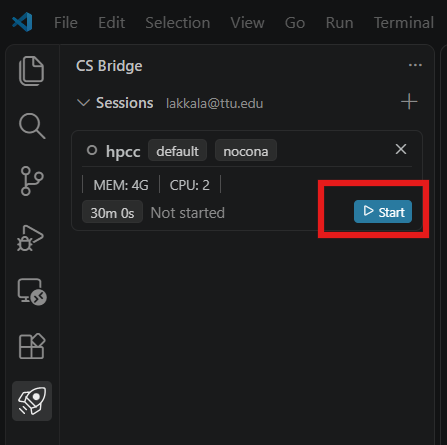
- Wait until the session state changes to Running. If the cluster is busy, the job may remain Pending until Slurm can allocate resources.
- Select Connect. A new VS Code window opens and attaches to the allocated compute node.
Do not confuse the two windows: The local VS Code window is used to manage CS Bridge. The new remote VS Code window is the session running on the Slurm-allocated compute node.
9. Verify that VS Code is running on a compute node
After connecting, choose Linux → Trust and continue,
Open Terminal → New Terminal in the remote VS Code window and run:
hostnameA successful session should return a compute-node hostname and a Slurm job ID. For example:
echo $SLURM_JOB_ID
echo $SLURM_JOB_NODELIST
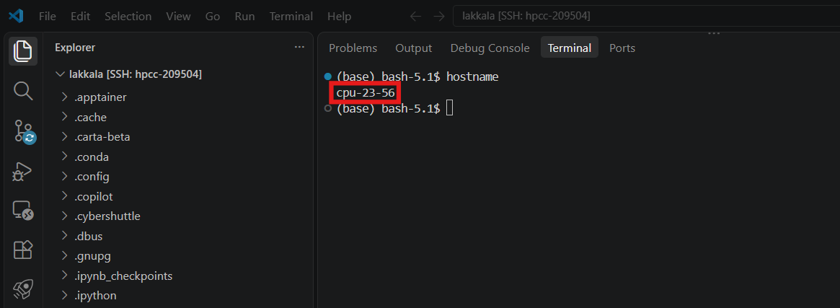
Expected result: The hostname should be a compute node. If the terminal reports a login-node hostname instead, do not run compute-intensive work, stop and verify the CS Bridge connection.
10. Working in the session
- Open your project files from locations available on the cluster, such as your home/project filesystem.
- Run terminals, interpreters, compilers, debuggers, and development extensions from the remote VS Code window.
- Stay within the CPU, memory, GPU, and walltime resources requested for the Slurm session.
- Use an appropriate GPU partition only when your workload requires GPUs and you are authorized to use that partition.
- For large file transfers, use the normal HPCC-supported transfer method (Globus Connect) rather than relying on the Dev Tunnel. CS Bridge documentation notes that relay throughput can be slower than direct SSH transfers.
11. Disconnecting, reconnecting, and stopping sessions
11.1 Close VS Code without ending the Slurm job
Closing the remote VS Code window does not automatically cancel the
Slurm allocation. CS Bridge supports persistent sessions so that you can reconnect
while the job is still active.
- Close the remote VS Code window.
- Return to the local CS Bridge panel.
- Select Connect on the still-running session to reopen it.
11.2 Stop the session when finished
When you no longer need the allocation, explicitly stop the CS Bridge
session so the resources are returned to Slurm.
- Return to the CS Bridge Sessions panel.
- Select Stop for the active session.
- Confirm that the session is no longer Running.
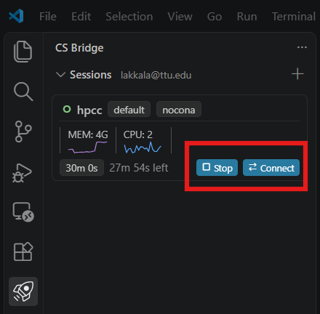
Best practice: Do not leave Slurm allocations running unnecessarily. Closing the editor is not the same as stopping the job.
11.3 Walltime expiration
When the Slurm walltime is reached, Slurm ends the job and the associated remote VS Code session becomes unavailable. Start a new session if additional time is required.
High Performance Computing Center
-
Phone
806.742.4350 -
Email
hpccsupport@ttu.edu