
Lesson 5: Advanced Programming Techniques
LEGO NXT programming can be much more complex than simple moving and detecting. There are a number of other functions the NXT brain can carry out. Using some of these other techniques in your lessons can help not only improve your student's knowledge of LEGO robotics, but also their knowledge of basic computer programming.
The Sound Block
The program below is not terribly complicated, can come in handy while testing a program, and is generally just fun for students. The third block is a "Sound" block, which will play one of the various sound files that come with the NXT software.
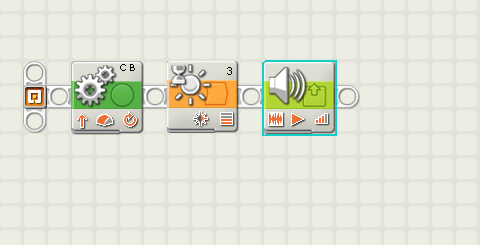
The sound can be either a simple tone or beep, or it can be a file that usually is a robotic-sounding voice saying, "good job", or a number of other things. You can choose which file you want using the selector at the right of the sound block menu. This is not a great thing to spend an entire lesson on, but combining it with the wait block makes a fun challenge for students. Challenging the students to have the robot stop on a piece of black tape or stop three feet from a wall and say something funny will help solidify how to use sensors and also keep the students from getting bored.

The Display Block
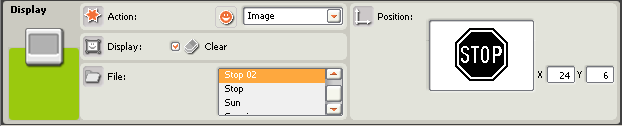
A similar function on the NXT is the display block. The display block will show an image on the NXT screen. The images range from a variety of signs and smiley faces, to other wacky pictures. This serves little actual function, but can once again be a fun activity to use along with one of the sensors.
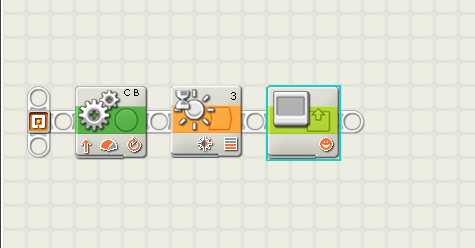
You can change the dimensions of the image and the image itself with this block menu. Letting your students get creative with the display and sound blocks can be a good for keeping younger students interested.
Loops in NXT
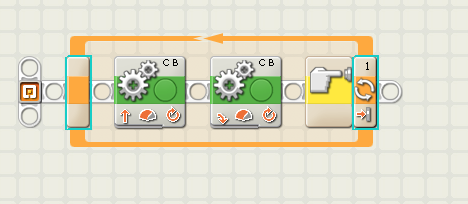
A loop is a programming idea found in all programming languages. Loops do what it sounds like they do — continue the same thing over and over again until there is some kind of stop condition. In NXT programming, the loop is another drag and drop piece like the blocks, but this one acts like a house for regular movement and other related blocks. Dragging a pair of blocks inside the loop looks like the image below. This program loops for infinity, shown by the infinity symbol at the end of the loop. The program will move forward, then turn right repeatedly until the user stops the program manually.
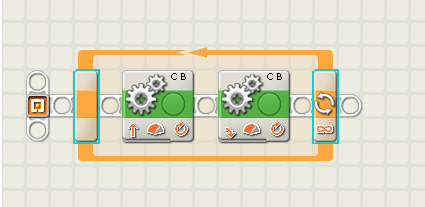
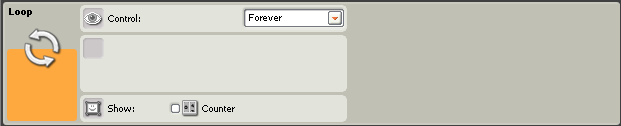
This is the loop menu. As you can see below, the control criterion is "Forever". This is not a very desirable effect in most programs, so luckily you can change it to a number of different stop conditions. The simplest of these conditions is the "Count" option, which allows the programmer to choose an exact number of times for it to loop. This can be useful, but not as useful as some more active control measures, like looping with sensors.
The loop program shown below is a bit more complicated than the first one, but much more applicable. This program tells the robot to move forward, then turn over and over again until a signal from a sensor is triggered. This time the sensor is the touch sensor, which can be seen on the loop's ending block.
The menu changes a lot when the sensor option is selected. There are several different sensor options for the loop, but the one chosen for this example is the touch sensor. When the sensor button is pressed, it will end the loop. This can be used as an input from the NXT user telling it to stop whenever he or she presses the button, or when the button is pressed against a wall or obstacle.

Using loops is an important lesson for any higher-level class. Loops are a way to make the robot more autonomous and can be used to hone a student's programming skill. Loops can be hard to manage sometimes — and will take some practice — but they are worth the trouble. Starting with a simple exercise — like using a loop to accomplish the tasks from Lesson 4 instead of a wait block — can be effective examples of loops. A more complicated challenge is due if your students have no trouble with that. A more complicated example can be seen at the bottom of this page.
Switches in NXT
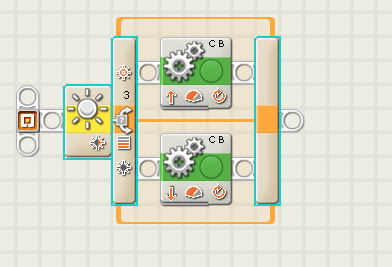
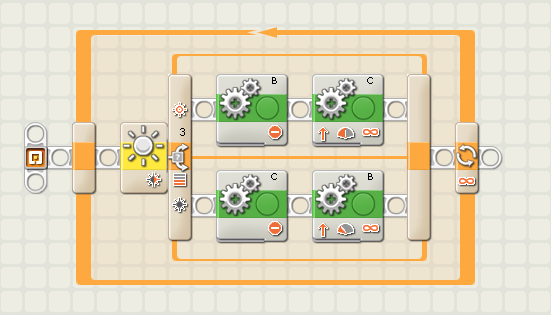
Anyone familiar with programming will recognize this as the LEGO equivalent of the switch statement. Everyone else may think of it like a light switch —it chooses one option or another. This switch statement below uses the light sensor. What it says is, if the reflected light is brighter, go to the top option; if it is darker use the bottom option. There happens to be no difference between the two blocks below, but if there were, then the robot would decide which one to switch to based on the light sensor's readings.
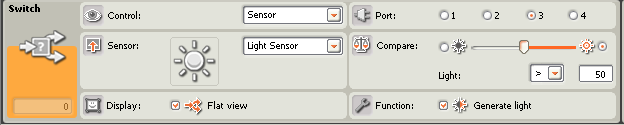
Like the loop menu, the switch menu lets you choose the sensor option and which sensor to use. Unlike the loop menu though, the switch only activates once and chooses an option, the moves on to the next part of the program. However, more than one block can be placed in each box in the switch statement.
Another short lesson about the switch would be helpful to more experienced students. An example of a good lesson is challenging the students to make a program that will have the robot drive up to a piece of tape and have the robot go left if there is a dark piece of tape, or right if it is a light piece. By now your students should be able to handle such a challenge easily, as soon as they learn the concept of the switch statement.
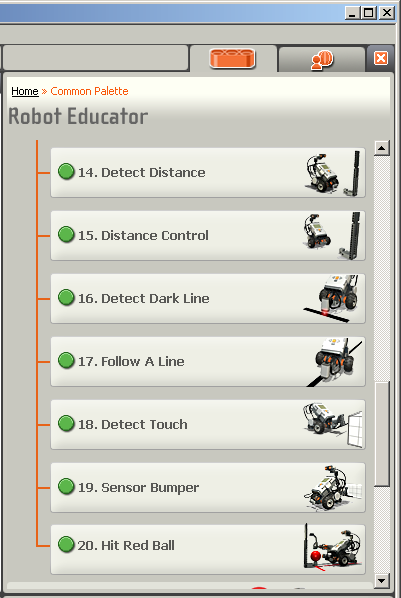
Using the Robot Educator Palette
The Robot Educator Palette is a brilliant tool for teachers. It gives a step-by-step building and programming guide for very interesting and complex programs. The classic example is the line following robot — a robot that follows along with a line of black tape that that can be straight or zigzagging. The robot uses a loop, switch, and light sensor to determine which direction to move — forward if the dark tape is detected or to the left or right if the tape is no longer detected. This complex program can be a fun and is a great demonstration to other students, parents, and administrators.
The Robot Educator Palette can be found to the right of the NXT screen and has more than 40 different programs to choose from, of varying complexity. The directions are all visual, and have little to no words in them. They might be hard for some students and even teachers to follow, but they are as direct as possible. I would recommend for teachers to peruse the Robot Educator for ideas for robotics projects, and find the level of complexity best suiting their class.
It is important to note the Robot Educator has both a building guide and a programming guide for each tutorial. Sometimes it can be hard to find the programming guide. It is generally below the building guide option, but scrolling down might be necessary.
Edward E. Whitacre Jr. College of Engineering
-
Address
100 Engineering Center Box 43103 Lubbock, Texas 79409-3103 -
Phone
806.742.3451 -
Email
webmaster.coe@ttu.edu